
Guide To…Direct Network Connection
UPDATE – March 2017
Raspberry Pi Remote Connections – Without A Network!
No keyboard or screen available for your Raspberry Pi, but you have a laptop? There is now a very easy solution!
There are often times when a HDMI monitor is not available to use with your Raspberry Pi. To overcome this I’ve often set-up my phone to be a portable Wi-Fi hotspot, but you do have to ensure the details are set-up ready on my Raspberry Pi beforehand.
So what happens if it is a new or someone else’s Raspberry Pi?
In those circumstances it can be very useful to remote connect using a nearby network and a laptop (see the Guide to…Remote Connections). You have two options here:
- If you have a wired connection available you can simply plug into it and look up the IP address on the router.
- If you have a wireless connection available, you can now place a file on the SD-Card with the required settings which should be transferred on start-up to the system (I’ll create a guide to this at some stage).
However, sometimes when you are travelling, at an event or perhaps in a school classroom there isn’t a network available either!
So how can we make use of a laptop screen and keyboard when there is no network?
As discussed previously (in the Guide to…Remote Connections), there is the option of using a (console) TTL-serial cable, however this only provides rather slow access. The serial connection won’t support X11 (which as we have seen, allows us to run graphical programs too), and you won’t be able use VNC or shared folders if you have them set-up.
The answer is a simple network cable!

Connect and use your Raspberry Pi with just a Network Cable, a standard Imaged SD-Card and Power!
It is advisable to set this up before you need it so you can be sure that it is configured and working correctly. Once you do you can use the methods described in the Guide to…Remote Connections to access your Raspberry Pi as if it was on a standard network (if you already have a network available you can just connect to that instead).
Remember if you need the wired network for your computer (i.e. to get to the internet) then you shall have to make a choice about which one you wish to use (or get an extra network port by adding a USB network dongle). If you use wireless connections, then you can still have both!
What you will need:
- Raspberry Pi (Model B, B+, 2B or 3B)
- Micro USB Cable & Power Supply
- Micro SD-Card (loaded with NOOBS see below)
- A network cable
Any standard network cable should be suitable (needs to have a male RJ45 connector on each end), most cables available will be fine for our needs.
Note: You can use a normal network cable since the Raspberry Pi LAN chip is smart enough to reconfigure itself for direct network connections (in the past older computers would have needed a special “cross-over” cable).
Don’t worry if you don’t have NOOBS setup already, it is possible to do everything you need without a screen or keyboard attached to the Pi… Just configure the SD-Card and add power (see the section below for automated installs). If you are already set-up with a recent NOOBS/Raspbian install then it couldn’t be simpler.
Connect and go!
Previously this process was rather difficult without a screen and keyboard attached to the Raspberry Pi. This was because, by default, the system would not set-up an IP address when a cable was connected. This meant you had to configure the Raspberry Pi manually to have a fixed IP address appropriate for the temporary network.
Thankfully, things have finally moved forward and the latest installs of Raspbian include software which detects a new network connection and automatically assigns a suitable IP address. This is a HUGE help!
The final piece of the puzzle, is now we have a valid network link we still need to know what IP address the Raspberry Pi had given itself so we can tell our software to connect to it.
Fortunately Apple have this covered with their aptly named “Bonjour” service which checks the addresses on the network and ensures their hostnames are valid. A hostname is simply like a nickname given to a computer so you don’t need to remember it’s full address, just call the nickname instead.
If you don’t want/can’t install Bonjour then you will have to find the IP address either directly on the Pi using “hostname -I” or using a network scanner such as Fingbox (https://www.fingbox.com/download).
This means you can now use the Raspberry Pi by just referring to it’s hostname, by default this is set to raspberrypi.local or raspberrypi.
Hello Bonjour
If you have a OSX Mac you will have Bonjour running already. On Windows you can either install iTunes (if you haven’t got it) which also includes the service, or you can install it separately (via the Apple Bonjour Installer).
We now have a simple network just for two, allowing SSH, X-forwarding, file shares etc etc. We can now do all the lovely networky things we like to do, as detailed in the Guide to…Remote Connections page.

Scratch running nicely inside a window using X-11!
There’s even more good news for the Pi-Zero
This method has been used in the Pi-Zero network device video for excellent results. It is particularly special since we use the Pi-Kitchen to pre-configure the USB to act as if it is a network device – allowing us to make a simple network link using just a standard micro-USB cable (which will also power it!).

Raspberry Pi Zero with Micro SDCard and Micro USB Cable.
Installing NOOBS to your SDCard
Update: In order to put security first, the default operating system install (such as the one provided by NOOBS) no longer has SSH enabled.
https://www.raspberrypi.org/blog/a-security-update-for-raspbian-pixel/
If you want to later use SSH you will need to add a file called “ssh” to the boot partition on the Raspberry Pi. This can be done with the following command:
sudo touch /boot/ssh
This means that although you can perform an automated install without using a screen, you won’t be able to connect to it! Unfortunately, in the name of improved security, this method for running a Raspberry Pi headless has been broken (although I shall see if this can be fixed in newer versions of NOOBS). There IS a work around if you are brave (thanks to Procount). Another option is to add vncinstall to the end of the recovery.cmdline file.
Note: If you already have an up to date install you can skip this!
Load SD Card with NOOBS:
- Download NOOBS.zip from the RaspberryPi.org website.
- Format the SD-Card using the SD-Card formatter (SDFormatter)
- Extract NOOBS.ZIP to the SD-Card
Note: Your SD-Card should look something like this (with all the files in the root of the SD-Card and not in a directory).
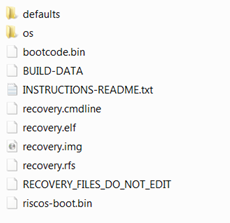
NOOBS files on the SD-Card
Automated Headless Install:
Option A: Using NOOBS
Although not a commonly known feature, NOOBS is able to automatically install a selected operating system without the need for a keyboard or screen.
To perform an automated install of Raspbian, you will need to edit the recovery.cmdline file on the SD-Card.
Note: If you are editing this file in Windows it is recommended that you use an editor which supports Linux format files (such as the freeware Notepad++).
Change the recovery.cmdline file:
runinstaller quiet ramdisk_size=32768 root=/dev/ram0 init=/init vt.cur_default=1 elevator=deadline
By adding silentinstall to the file (keeping everything else the same):
silentinstall runinstaller quiet ramdisk_size=32768 root=/dev/ram0 init=/init vt.cur_default=1 elevator=deadline
Option B: Pi-Kitchen
Set up Pi-Kitchen & select Auto Install (see the Pi-Kitchen pages for more details).
Note: The Pi-Kitchen allows complete customisation of the install and allows you to define multiple “flavours” set-up in whatever way you like.
Power Up & Install:
- Insert the SD-Card into the Raspberry Pi
- Connect the network cable between the computer and the Raspberry Pi.
Note: The network port on the Raspberry Pi will sense the connection type and automatically provide a cross-over for direct networking. Therefore we can use any standard RJ45 cable.
Add power and wait…and wait…and wait some more. You should see the activity LEDs flash while the OS installs. Depending on your SD-Card this can take up to 40-60 minutes. If this is your first go it is helpful to connect a screen so you can observe the installation progress.
Check your network settings…
While the OS is installing you can check your computer’s network settings are set to automatic. And if required we can enable Internet Connection Sharing (ICS) so we can use the host computer’s internet (assuming it usually connects to the internet via Wi-Fi).
Note: Most network set-ups will be set to automatic but if not ensure you write down the automatic, but if not ensure you write down the original settings so you can restore them later.
Set each of the settings to automatic which will allow the network to configure it.

Network Settings
Enable Internet Connection Sharing (ICS):
Select the ICS tab and select share this connection, and if needed select the network adaptor which your Raspberry Pi is connected to.

Internet Connection Sharing
That’s it, when the Raspberry Pi starts it should detect the settings and configure the internet gateway to match the IP address of the host computer.
Ready to connect?
When the Raspberry Pi has finished installing you should notice that the network adaptor will report “limited connection”.
NOTE THE FOLLOWING:
- You will need to wait for your computer to finish detecting the network settings (you may see a small networking icon flashing in your system tray while it does, or open up the network settings to see when it has finished and has an IP address) – it can take around 1/2 minute. Your computer may report the connection as “limited or no connection” when connected to the Raspberry Pi in this way, this is normal as indicates it is a direct computer to computer connection rather than a standard network (where it would expect to find an internet connection).
- If you are using multiple wired network adaptors (i.e. Using an extra USB-LAN dongle) on your computer you may find you have to unplug the other network cable and reattach afterwards (my Windows XP machine needed this before it would connect through the direct link).
Summary
Now you should be able to do most of the things you would normally do when connected to a network.
One VERY useful thing to do is to set up “Putty” and “Xming” to allow you to control the terminal and graphical programs directly from your laptop/computer.

Scratch running nicely inside a window using X-11!
See the main Guide to…Remote Connections for links for how to set-up VNC and shared folders, and X-11 on other computers.
Install Putty and Xming Server (for SSH and X11)
I am assuming you are using the latest version of Raspbian which has SSH and X11 Forwarding enabled by default (if not see the bottom of this post to enable them if things don’t work).
1. Install and run a X-Windows server on your computer
Download and run http://sourceforge.net/projects/xming/ from the Xming site.
Follow the installation, including installing “Putty” if you don’t have it already. You can also download “Putty” separately from http://www.putty.org/
An alternative X-Windows server is available called mobaxterm, this provides a little more control, keeps your X-Windows together and handles your sessions etc. You can get it from http://mobaxterm.mobatek.net/. (Thanks to Mike for this tip).
2. Ensure your SSH program (Putty) has X-11 enabled.
In the PuTTY configuration, find “Connection”, “SSH”, “X11” and tick the check-box for “X11 forwarding”. If you leave the X display location blank, it will assume the default “Server 0:0” (you can confirm the server number by hovering your mouse over the Xming icon in the system tray when it is running). You can save your set-up within Putty so you will won’t have to do this each time.

Putty Configuration for X11 Forwarding
3. Enter the Raspberry Pi’s IP Address

Putty Configuration for given IP
Enter the IP Address of the Raspberry Pi in the Session settings above (you may also find that you can use the Raspberry Pi’s hostname here instead (default: raspberrypi)).
Save the setting using a suitable name (RaspberryPiDirect) and press “open” to connect to your Raspberry Pi. You will likely get a warning pop-up stating you haven’t connected to the computer before (allows you to check you have everything right before continuing).
All being well, you should be greeted with a prompt for your username and password (remember the defaults are pi and raspberry).
4. Using X11 and Xming
Ensure you have Xming running, by starting the Xming program from your computers start menu and then in the terminal window, type a program which normally runs within the Raspberry Pi desktop (such as “leafpad” or “scratch”). Wait a little while and the program should appear on your computers desktop (if you get an error you have probably forgotten to start “Xming”, so run it and try again).
- If you want to run an X program, but still be able to use the same terminal console for other stuff, you can run the command in the background with &:
i.e. leafpad &
Just remember that the more programs you run, the slower everything will get. You can switch to the background program by typing “fg”, check for background jobs with “bg”.
- You can even run a full desktop session through X-11, although it isn’t particularly user-friendly and VNC will produce better results. To do this you have to use “lxsession” instead of “startx”.
- If you get the following error (or similar) when running PyGame or Tkinter scripts:
_tkinter.TclError: couldn't connect to display "localhost:10.0"
Use the fix below:
cd ~
sudo cp .Xauthority ~root/
More details and links are in the main Guide to…Remote Connections.
Additional Information / Troubleshooting
- To switch on (or off) SSH you can access raspi config (just type “sudo raspi-config” from the terminal) and select SSH in the menu (it seems like SSH is already enabled by default for some distros).

- Enable/Disable SSH via Raspi-config

- Ensure X-11 forwarding is enabled on the Raspberry Pi (again, a lot of distros now have this enabled by default).
Use nano with the following command:
sudo nano /etc/ssh/sshd_config
Look for a line in the /etc/ssh/sshd_config file which controls X11Forwarding and ensure it says (with no # before it):
X11Forwarding yes
Save if required (ctrl+x,Y, enter), and reboot:
sudo reboot
What is an IP Address / Hostnames / Pinging / Subnets?
An IP Address is like your phone number or post code, it simply allows other computers to find that particular computer in the network and ensure any messages it sends goes to that one in particular.
Often, IP Address’s can be replaced with hostname’s so that we can ask for a specific computer without knowing all the numbers (like the contacts list on your phone, the computer looks up the name and uses the number for you). For instance, http://www.google.com, is a hostname, where it’s IP address is 173.194.45.49 (probably depending on where you are). We can “ping” the address using the following command, which simply sends some short messages to see if there is another computer on the other side to respond to them.
ping www.google.com
or:
ping 173.194.45.49
Subnets:
Networks use subnets to help handle the fact that there could be a HUGE number of computers on a network (like the internet) and it would be impossible for a computer to listen to and respond to any computer in the address range 0.0.0.0 to 255.255.255.255.
To handle this, networks will use a subnet mask, this ensures that a computer only needs to respond to computers with are within the same SUBSET, which is defined by the SUBNET MASK setting.
The mask is a series of flags which defines which range of addresses the computer will respond to (by filtering out any which are not within the allowed range):
255.255.255.0
Means it will respond to computers which have IP addressing matching at least the 3 first numbers. So a computer with an address of 192.168.1.90 and subnet mask of 255.255.255.0 will only talk to other computers with addresses in the range 192.168.1.0-192.168.1.255 (except 90 of course!). Large networks often use SUBNETs to split up larger networks into sections so that they run more efficiently.
Note: You will not be able to set the SUBNET MASK to wider than 255.0.0.0. The Raspberry Pi defaults to a subnet mask of 255.255.0.0, which is perfect for most situations.
Trouble-shooting:
Steps to check:
1. Check the IP address which get set on both machines (both should be in range 169.254.x.x).
On RPI use one of the following commands:
hostname -I
ifconfig
On PC use the following (or look it up from the Network & Sharing Center and look at the adaptor properties):
ipconfig
- If this fails, check the cmdline.txt file is right/cable connected etc. You can use the following to force the IP address on the RPI (for testing the rest – but this won’t be set next time you reboot):
sudo ifconfig eth0 169.254.0.2
- Check you can ping each of the addresses from the other computer (where 169.254.0.xxx should match the computer you want to talk to). Test both directions.
ping 169.254.0.xxx
- If this fails, check PC’s firewall and disable wifi (sometimes the ping command will try using the PC’s wifi instead)
- Check you can connect via SSH (using putty)
- This should work if you can already ping the other machine (it is unlikely to work if you can’t ping it).
References:
Thanks to fellow MagPi – Colin Deady for testing out on Mac for me.
Thanks to the following sites for providing various parts of the puzzle (in no specific order):
www.kernel.org – kernel documention
http://learn.adafruit.com/adafruits-raspberry-pi-lesson-6-using-ssh
http://people.arsc.edu/~murakami/xming/
http://jeremy-nicola.info/portfolio-item/ssh-x-forwarding-on-windows/
http://en.wikipedia.org/wiki/Subnetwork
http://en.wikipedia.org/wiki/Link-local_address
http://www.raspberrypi.org/phpBB3/viewtopic.php?f=29&t=22716
http://www.raspberrypi.org/phpBB3/viewtopic.php?f=27&t=24993
http://www.raspberrypi.org/phpBB3/viewtopic.php?f=32&t=26934

nice tutorial man!
It worked for me until i reflashed sd card with same disto as before, latest version of raspbian and now i can’t get it to work, unfortunately i have no hdmi capable screen so that option is off
my os is windows 7 64bit and pi is model 2, hope you can help
I’ve not tried direct network with latest, but it “should” work. Shall give it a go and see what happens!
Alternatively:
If you have a normal network, then you can use a wired connection to your router. I use a USB wifi dongle and connect remotely to that.
I followed your instructions and I was able to connect my mac to the Pi perfectly fine so thank you. However, my USB wifi dongle doesn’t work anymore. Only work if I revert back to the original cmdline.txt file. Is a possible to have both connected to the Pi? In other words, the ethernet connection uses 169.254.0.xxx and USB wifi dongle uses 192.168.0.xxx to connect to my wifi router.
Can the Pi be connected to a computer via the Ethernet (eth0) cable as you explain here and at the same time have USB WiFi dongle (wlan0) connected to a WiFi router?
Dear friends, I wrote script switchip.sh to change ip address but after tzping command ./switchip.sh, I get answer permission denied. What am I doing wrong?
To switch the ip you are changing the cmdline.txt file, which is owned by root. You will need to use sudo in the command so you have permission to change it.
Thanks worked for me. (I did not do direct or normal things. I simply added ip thing to the cmdline.txt)
By the way if you want to use internet over your laptop for raspberry pi replace “ip=192.168.0.2” with “ip=raspberrypiip::laptopip” (also google “how to share internet with raspberry pi” to see proper settings for network on your laptop)
I’m only presented with a recover.cmdline file instead of cmdline.txt when I open the sd card folder.
What do I do in this case?
See in the text:
Note: These instructions are only applicable to manually installed installations (i.e. those which are imaged directly using SDimager rather than using NOOBS. Unfortunately, if you use NOOBS the OS boot partition is moved and is no longer directly accessible from windows. You will need to either image your card manually or use a linux computer/LiveCD/Virtual Machine to access the OS boot partition and edit the cmdline.txt file directly.
Unfortunately NOOBS makes this method more complicated than it needs to be, as the cmdline.txt is not visible from windows.
And how does one do that if you don’t mind me asking 😛 ??
I’m a noob using NOOBS and a laptop. Had the same issue as Skandalakis…
Unfortunately NOOBS made this trick more difficult.
If you have a wired network available then the PiKitchen has options for enabling automatic installs using NOOBS.
I have the same issue. Just bought my first Raspberry with erased SD card. I have no monitor with HDMI. How to move on from that point to step 1 in the tutorial? I presume installing NOOBS is not a good idea, but I think the tutorial assumes some OS is installed. How do I get to that point?
The tutorial assumes you directly write an img file to the SDCard (see http://www.raspberrypi.org/documentation/installation/installing-images/README.md).
However…PiKitchen is how I do things now…since you can build a full setup on your sd-card and have it install automatically. The PiKitchen uses NOOBS, but customises the card after it has installed the OS, so you get the best of both.
For a basic setup, you can use NOOBS to perform an automated install and connect to your network via a cable. PiKitchen is able to configure WiFi adaptors etc but you will have to test if your adaptor is supported by Raspbian first.
Hi In the sd card i received i dont see cmdline.txt file but it has recovery.cmdline I tried modifying this file with ip=…. but it says network connection error connection refused when i open putty. Please suggest the fix.
NOOBS uses the first partition of the SDCard, previously this would have been the BOOT partition which contained the cmdline.txt discussed in the article.
You can access this partition if you use linux to read the card.
Is there any way to access the boot partition from a Windows 7 computer?
Not on a NOOBS install… well there are some tools which allow you to read files from windows, but easiest way is to use a Linux Live CD (GPartedLive or Ubuntu) or another RPi.
hii
i did all the steps, but once i open my Xming server the desktop for the raspberry Pi show up but it looks like it does not fit on my Laptop Screen how can I adjust that?
Thanks
You can adjust the resolution of the display screen in config.txt on the boot partition. This should also adjust the screen size for X11 forwarding.
So after i set up all this? I feel like i did everything right but im still just staring at my laptop screen… what did i miss?
Once you have a valid network connection you can use ssh, x11 forwarding or vnc. See the remote connections guide for details.
How do I find the Linux network settings? It looks like you are about to tell us, but you just tell us how to access network settings on Mac.
It will depend on the distro you are using. Typically there are general settings or a network icon in one of the corners.
Hello again!
So, I removed NOOBS (via SD format) and reinstalled the images the old way to get this method to work. (Used option 1 in step 2)
I reached step 3 and installed the X server (it said with PuTTY but I could not find anything on my laptop proving that it had indeed been installed, so I downloaded and installed it separately.)
I set the PuTTY with X11 and wrote the IP address. Clicked Open and it opens a black terminal-like window showing nothing. I can’t type in it or anything. (I first tried it with the recommended Host name “raspberrypi”. It gave me an error prompt stating this host doesn’t exist.)
After about 10 seconds an error prompt appears saying “Connection timed out” and the terminal window thing dissapears after i press ok.
I’ve hit a road block once more… What did I do wrong?
I have the same problem too! When I used an HDMI cable and connected to a separate monitor I found that the raspberry pi changes its ip address every time I reboot it. However, I followed the steps above that was supposed to keep the Pi’s ip address the same and it didn’t work; the ip address still changed even with the files….
Please disregard the above reply… I got it by typing in sudo cp /boot/cmdline.direct /boot/cmdline.txt
before rebooting the Raspberry Pi. I don’t know if this will work for everyone but perhaps it may help…
BTW – tried many many tutorials and this is the only one that worked!
Question – any tips on how I might then share my mac’s wifi with my directly connected rpi?
Hello,
I’m confused. When you are downloading Ximg and putty are you putting it on the raspberry pi, or the notebook computer or both? Also how do I get to the Putty configuration? Thanks
You will need to load Putty and Ximg on the computer you wish to control the Raspberry Pi from.
The Putty configuration is on the left side of the Putty window (the tree of options).
Hello,
I can not find a “cmdline.txt” file to edit after i copied the information onto my SD card following one of the tutorials. Anyone else have this issue
Please see the notes regarding using NOOBS which means that “cmdline.txt” is no longer viewable.
Can the Pi be connected to a computer via the Ethernet (eth0) cable as you explain here and at the same time have USB WiFi dongle (wlan0) connected to a WiFi router?
Yes, but you may have to specify the configuration in the network file rather than command line so you can specify the interface name (as listed via ipconfig)
This might be useful for other people – I edited the cmdline.txt using notepad and kept getting the black terminal and time out when I tried to connect using putty. It turns out there is an end of line/ end of file character which notepad doesn’t display – you need to put the ip address BEFORE this character but with no extra space(so the line ends …rootwait ip=169.254.0.2EOF)
If you use Linux often I highly recommended a text editor like notepad++ which supports the different file line endings.
To begin with I wanted to tell you this is an incredible tutorial. I didn’t know if I would be able to find such a good tutorial about a rare problem like this one. It clearly stated how to follow most steps and also cleared a lot of concepts I didn’t completely understand, not like most tutorials of this kind that just expect you to follow instructions without really understanding what you are doing.
Now here is my doubt. I have a Mac and was able to follow every step until Step 3, which I didn’t do assuming the ssh command in the OS X terminal would be enough to connect to the Raspberry Pi. However, now I have the Raspberry Pi powered on and with the SD card in, connected through the ethernet cable to my Mac, but I’m not able to ping or connect through ssh to the IP I gave it 168.254.0.2 (my Mac IP is automatically configured) . Apparently, there are always response timeouts when I ping, or a message saying that the Mac couldn’t find a route to the host. I’ve already tried to connect to other networks in my Mac or changed the IP of the RPi. Any idea of what can be going on or how could I solve this?
Thank you,
Thank you for your kind words, I love trying to share as much knowledge as I can, after all it is how I learnt.
Make sure both IPs on Mac and Pi are on similar IP addresses I.e 168.254.0.2 and 168.254.0.1 (or is it 169??).
I don’t do much with Macs so it may be something else I’m not aware of being a problem.
Hi all, thanks for the informative post. However, am still unable to connect my laptop to the pi. I want to connect the pi without Internet access but after editing the cmd line.text file in my windows 7 laptop am still getting a fatal error when I try to power up the raspberry pi. I have raspbian Jessie OS pre-installed and I followed all the instructions . Please help
Does your SDCard have cmdline.txt on your first partition? You may have a NOOBS install which works differently.
I’ve not tested this setup with Jessie, as I now use Pi-Kitchen to configure my wifi and just connect via my network (or hotspot on my phone).
Is this method working with an OS built using buildroot default configuration for raspberry pi : raspberrypi_defconfig because i tested and it not working ?
I’ve not tried buildroot so I can’t confirm this works. The OS will need to support setting of the IP address via the cmdline.txt file in the /boot/ partition. However, you could always set the IP address directly within the OS itself if you wanted.
Seriously man Thanks a lot 🙂 Btw you might want to add a note that step 2 option 1 wont work if you have installed noobs, cause i dint find cmdline.txt in the root folder.
This is mentioned at the start under a note for NOOBS users. Unfortunately NOOBS made this method less useful.
However…these steps may not be required if you install Apple Bonjour / iTunes (allowing you to connect using raspberrypi.local).
Hi. Great tutorial, thanks. I need help on one aspect, though.
I followed these steps to connect my brand new RPi2 (I’m new to RPi) to my Win7 laptop, without having a monitor to set everything up even for the first time, with the latest Raspbian (i.e. not using NOOBS) on the card. For IP address I used your suggested ip=169.254.0.2. I was able to connect and communicate with the RPi. Success!
However, since I used a brand new RPi and card, the OS image was smaller than the whole card, using raspi-config, I selected ‘Expand root partition to fill SD card’ . After that, RPi offered to reboot, I agreed. However, after that, I couldn’t connect to the RPi. I was playing with modifying network properties in Control panel on my laptop, also trying to connect to ‘raspberrypi’ using PuTTy, trying to ping the IP address, but to no avail. I couldn’t rewrite the cmdline.txt, since I couldn’t connect to my RPi. I had to pull the plug without proper poweroff. After that I rewrote the OS image to the card again and now can connect again (but without expanding the root partition).
I don’t see a reason why expanding the root partition should have caused the problem with the connectivity. Do you have any idea what could be the problem and how could I solve it? Any help would be appreciated! Thanks a lot.
Not sure why this would cause this, I’ve not had it happen for me.
It seems the later versions of Raspbian will allow connection using hostname “raspberrypi.local” but you will need to ensure you have Apple Bonjour installed. I’ll update the guide when I’ve had chance to write it up.
I tried to connect raspberry pi with laptop, when I gave the lxsession command, it shows only one lxsession should be executed at a time,.. What I have to do now?
Not seen that before. Are you able to use other graphical programs through X11 forwarding? Otherwise, perhaps try VNC instead.
Wow, super complicated. This can be done easier:
If you are using a Linux System as Laptop, you can use the package avahi-autoipd to automatically negotiate an IP for each system. Make sure that package plus general avahi (that gives you hostname.local access automatically, it is called mDNS) is installed on both systems (raspberry pi and your laptop)
In my case both Systems run Debian, Rasbian on the Pi and Debian Wheezy on the Laptop.
Then you can use the following bash script on the laptop:
(this is assuming that you are using network-manager, which most Linux systems do)
—————–
echo “removing any previously running avahi-autoipd instances…”
avahi-autoipd -k eth0
echo “stopping network manager”
service network-manager stop
echo “running avahi-autoipd in deamon mode, find logs in /var/log/daemon”
avahi-autoipd -w -D eth0
read -n1 -r -p “Press any key to terminate autoipd and restart network-manager…”
echo “terminating avahi-autoipd”
avahi-autoipd -k eth0
echo “starting network manager again”
service network-manager start
——————–
The read statement in then middle pauses so that you can push any key to restore the old config with network-manager.
Unfortunately, Network-Manager and avahi-autoipd don’t play nice together and one needs to be off for the other one to work.
But avahi-autoipd does work well, it talks with the same daemon on the PI and negotiates an IP address automatically for both systems.
If you setup avahi (which is the name for zero config on Linux), the systems will also know each other via a dns name, usually it will be [HOSTNAME].local, so you won’t have to fiddle around with IP addresses at all.
To make sure avahi does that properly, use avahi-discover to list systems in your network.
It is easier than that, I’ve just not had time to update. The original method worked without installing anything on the Pi, but NOOBS broke that.
Latest install you only need Bonjour on the laptop and you can use the Raspberry Pi hostname to connect.
These instructions saved me. Thanks! My own situation was that I was trying to direct connect to a pi via a machine running debian stable (currently Jessie) and it wasn’t detecting the pi as raspberrypi.local. Note that the problem is resolved by upgrading to the Debian testing distro, but for other reasons I prefer to stick to stable, so these instructions are very nice!
I did not want to criticize you, thanks for doing all the work writing it down. I just loved the one I found, as I just tried it out and it worked so great. I have been setting IPs manual for as long back as 1998 and I have every time I did it thought: There must be a better way to do this!
And so I was very happy to have found it and wanted to share it.
No problem, superb info. All comments are welcome, will hopefully update when I get time.
Hi there! I recently got my RPi 3 and installed Raspbian using NOOBS, which came preloaded on the SD card. I then was able to access the cmdline.txt file throught Kali nad I edited it as said. However I get a Destination host unreachable error while trying to ssh into my Pi (from Kali).
Can you please help me?
Kali may be different to the Raspbian setup.
Is there a way to apply this to Orange Pi PC? I followed your steps upto Step 2, because I only had two files on the SD card installed, namely:
uImage (Type: File)
script.bin (Type: BIN File)
instead of the cmdline.txt file.
The SD card has the “Raspbian_For_OrangePi_PC_v0_8_0.img” written on it (directly from the Orange Pi download website.
Not used Orange Pi. But when I update this page, the newer method should work for any Linux system.
I am having a difficulty with Xming. Once I have the pi open in Xming it crashes. Any thoughts?
I’ve started using MobaXterm not only X11 forwarding but plenty of other features including SSH and file access.
Seems to work with windows 10 nicely.
I’ve followed instructions above and everything is OK, thank you very much
Now I like to see the graphical Desktop of RPi, I typed “startx” in the puTTY console, I got error.
is it possible to have the graphical interface of RPi on the laptop?
See the remote connections guide regarding x11, you’ll need to use lxsession to start it. Or use x11 vnc.
Hi! Thanks for the tutorial, although I haven’t been able to get it working yet. I can ping the RPi from my laptop (Windows 7), but I can’t ping the laptop from my RPi. It never responds, not even with an error message, I have to kill it with Ctrl-C. I checked the firewall settings on the laptop, but couldn’t find any issue. I also double-checked the IP address, but it looks OK. Any suggestions?
Take a look at the update, things should be a lot easier (hopefully).
Could you explain we one thing? Actually I often use RPi by my tablet with VNC viewer. Is it possible now to do similar thing without any network? I’ve got network cable and corresponding slot in tablet.
It will depend on if the version of android you have will give itself a suitable IP address and if it supports bonjour so you can use the hostname (otherwise you may have to use the older method and set a known IP address). Suggest you try it with keyboard and screen attached and check the IP addresses given and confirm if it works.
Hello, we bought a Raspberry Pi starter kit (board/case/SD card/power cable) for my Stepson who opened it this morning. We had checked how to use it on a laptop – hence being on here – and given him a network cable as he doesn’t have access to a HDMI screen at home. So he plugs it in and… blank screen! Disappointed 12 year old and we don’t know what to suggest 😦 Help gratefully received.
Plugging it in using a network cable should give you the ability to use remote connection software to interface with the Raspberry Pi. This should allow you to connect using SSH (a remote commandline), from there you can run graphical programs or install VNC software (which will provide remote access to the desktop) – (see the Guide to…Remote Connections).
You will need to ensure that the Raspberry Pi is setup to run a recent release of Raspbian, this is a lot easier if you can test it out using a HDMI screen. Once you have confirmed this, you can attempt connection via a network cable.
I believe this is a process similar with another one I saw in the internet, that is: activate the “internet sharing” of the WiFi of my Macbook Air through the “Thunderbolt ethernet adaptor”. That way I can access the pi through ssh and have internet connection in my Raspberry Pi.
The problem is that if I disconnect my Macbook Air WiFi, I not only loose the internet connection in my Pi (which is obvious) but I loose also the possibility of ssh connection from the Macbook to the Pi.
In this case this problem is solved?
Regards
Yes if I understand correctly, the wired connection should remain even if you switch the wifi on the laptop off.
Is there a technical reason I wouldn’t be able to use a standard network cable to directly connect a PC to a Raspberry Pi Model A ?
The model A does not have built-in network, so there isn’t a physical socket for the cable.
You can add a USB network adaptor but it may need additional setup and configuration.
Ah, my mistake. It must be a model B as it has an LAN port. It’s pretty old, so I assumed it must have been a model A.
I’m trying to put a cheap and cheerful media server together with the old pi and an oldish PC. The PC has a LAN port and a wireless adapter, so I was hoping to directly connect the PC to the pi directly without a router using a standard network cable. I loaded the PC with UBUNTU server 14.04 and the pi with OSMC/Kodi and thought I had configure the two network cards correctly so that the pi could access the Internet using iptables forwarding between the two network cards.
The pi isn’t connecting to the Internet though, so I thought there might be a hardware issue with the direct connection and I would need a router or a crossover network cable. May just as easily be a configuration error on my part too though.
Thanks for getting back to me so quickly.
Should just be a base of getting Internet Connection Sharing (ICS) enabled (should be covered in the posts).
No need to worry about the cross-over since the Pi will auto-switch to cover that.
i seem to get stuck on the wi-fi properties part. i get to wi-fi status and click properties but there is no “sharing” tab, only a “general” tab. please help
i also cant find the “Ethernet properties” tab… i am not huge with tech and im trying to learn
Sorry for the delay in replying. Which version of windows are you using, since they keep changing the locations of the properties.
Hello,
Thank you for your efforts, but with the new version you didn’t consider all use cases. For my purposes you fixed that hadn’t been broken. I use direct connection for remote programming (http://www.raspberry-projects.com/pi/programming-in-c/compilers-and-ides/netbeans-windows/installing-netbeans-for-c-remote-development-on-a-raspberry-pi).
For me it is both more convienent (to have a fixed ip adress of the build host) and easier: set it up once and forget and it just works with no extra applications. In particular, you way to fix the IP address (in cmdline.txt) is much easier than those found in Google. Luckily, I thought of looking in the webarchive for the old version, before I got the heart attack trying to remember its content.
I suggest you restore the old guide (on a separate page) for the case some one else (perhaps me again) need it.
Good idea. I should have the old version somewhere so I’ll do that (although it can add problems keeping various versions maintained).
Thanks for what it seems a good tutorial, unfortunately I can not connect my Raspberry Pi B+ (UK) to my Windows 7 laptop through network cable, completely headless with no HDMI nor router access. I think it can be because the updates of last releases in raspberrypi.org/downloads (november 2016), according to that “SSH disabled by default; can be enabled by creating a file with name “ssh” in boot partition”, and I did it creating such ssh file, but it does not works. I tried with NOOBS and Raspbian Jessie (Pixel and Lite). Do you have any suggestion? wich version of NOOBS (exactly date) did you use for this tutorial?
Well, I just find a way to connect, not sure what I was doing wrong before, but using Raspbian Lite image (the last one in novembre 8, 2016) and creating a file SSH inside, then I append “ip=169.254.44.88” (or any address in the subnet) to my RPi in the file cmdline.txt (still in Windows) and it works now! Thanks
Glad you sorted it. I’ve not tried the latest NOOBS, so I might have missed some changes.
hello friend, i am trying to connect my pi with the laptop which is a windows 7. now can u please help me if ethernet cable connection is sufficient enough ? if yes what i should do next. actually i am new to this and trying to learn so please do help me out. thankyou mate.
It is possible to do so with just a ethernet cable, however it is highly recommended to start with using a HDMI screen with a keyboard/mouse. Once you have your Raspberry Pi configured on your network you will be able to connect using your laptop. (See note on enabling SSH because this is now disabled by default)
What if when I attempt the headless install, there is no activity on the pi?
Is this with a version of NOOBS / Raspbian from after November 2016? Unfortunately SSH has been disabled by default, but this can be re-enabled by adding a file called “ssh” to the \boot\ partition. https://www.raspberrypi.org/blog/a-security-update-for-raspbian-pixel/
Why we need to enable wifi’s sharing even though we do not need to connect to Internet? But if we do not do that, I cannot connect to my pi via network cable. Anyone know the answer?
It should work like that, however it will depend on your network setup.
Check to see if the machine you connect the Pi to changes its IP address when you plug your network cable in. It should change the address to one that is suitable for direct network connections. The address on the Pi should then match the x.x.x.a part (where a is different from the other computer).
If internet connection sharing is enabled the PC provides a different IP address.
(It has been a little while since I’ve tried it though)
I just got a RaspberryPi 3 Model B and am trying to use it via my laptop. It came with an SD card that had NOOBS, so I connected my Pi to my TV and used my wireless mouse to install Raspbian. However this setup is inconvenient, and I don’t even have an external keyboard. I connected my laptop and RaspberryPi via ethernet cable but nothing happened from there. I adjusted all the network settings necessary including obtain IP automatically. I ran the command ipconfig in cmd and got:
Ethernet adapter Ethernet:
Connection-specific DNS Suffix . :
Link-local IPv6 Address . . . . . : fe80::8bf:3322:db8a:d9ed%11
Autoconfiguration IPv4 Address. . : 169.254.217.237
Subnet Mask . . . . . . . . . . . : 255.255.0.0
Default Gateway . . . . . . . . . :
Wireless LAN adapter Wi-Fi:
Connection-specific DNS Suffix . : fios-router.home
Link-local IPv6 Address . . . . . : fe80::30ae:79e7:f8e5:6472%14
IPv4 Address. . . . . . . . . . . : 192.168.1.183
Subnet Mask . . . . . . . . . . . : 255.255.255.0
Default Gateway . . . . . . . . . : 192.168.1.1
When I ran ping raspberrypi I got:
Pinging raspberrypi.fios-router.home [192.168.1.215] with 32 bytes of data:
Reply from 192.168.1.215: bytes=32 time=6ms TTL=64
Reply from 192.168.1.215: bytes=32 time=11ms TTL=64
Reply from 192.168.1.215: bytes=32 time=1547ms TTL=64
Reply from 192.168.1.215: bytes=32 time=5ms TTL=64
Ping statistics for 192.168.1.215:
Packets: Sent = 4, Received = 4, Lost = 0 (0% loss),
Approximate round trip times in milli-seconds:
Minimum = 5ms, Maximum = 1547ms, Average = 392ms
This is a different ip from the one listed above which confuses me. I also tried running putty and xming (I made sure to run xlaunch first to make sure xming was running) to no avail, I got the error connection refused when using hostname (raspberrypi) or first ip (169.254.217.237) and the error connection timed out when using second ip (192.168.1.215). I’m sure its something I’m doing wrong on my end as I’m not too knowledgeable on this topic and any help is greatly appreciated.
Thanks!
So I got putty to work, but xming still won’t work. I have run both xming and xlaunch and then type leafpad & into my putty session and it says:
[1] 1278
pi@raspberrypi:~ $ leafpad: Cannot open display:
Also, my true goal is to be able to use my pi as a pi right on my laptop as it is my only convenient display and I don’t have any external keyboard. Is this possible?
Yes this should be possible. You’ll need X-terminal enabled on the Pi (which I think is now the default), the X-Server running and the setting enabled in Putty. This is one option, although I’ve started using MobaXterm (there is a free version), which has X Server built in which means it usually works out the box. It also has many useful tools including network scanner (so you can find your Raspberry Pi IP address).
Also you can setup VNC (see the posts about vncserver-x11.
Yes I have gotten xming and vnc to work. Right now I use Tight VNC on my pc but I’m going to try realvnc because apparently, it will allow me to access my pi from another network.
Catch 42..
8GB SD card is not large enough for installation.
You can use a 64GB SD card, but there’s a catch. Using a 64GB SD card requires formatting with the exFAT filesystem.
Now.. SD Format app cannot format exFAT. I used WIN10 exFAT.. lets see what next error is LMAO.
Format as a smaller SDCard to install the OS, you can then expand the root partition from within Raspbian.