
Getting Started


Pi-Kitchen: Getting Started
Idea: Once you have completed this guide, you will create and add the following set of files to the top level of the SD-Card (you can check your files match the contents of the zip file if you get stuck):

NOOBS and noobsconfig setup
To create our PiKitchen setup, follow these steps:
1 – Download NOOBS
We need to first download NOOBS (you can obtain the latest version from the Raspberry Pi website). You can use either the full NOOBS version or the network install (obviously for the network install you will need a working wired network connection – installation through a WiFi adaptor is not supported).
2 – Extract NOOBS
Extract the NOOBS installation directly on to a new SD-Card (alternatively you can extract them locally on your hard-drive and transfer them to the SD-Card when you have made your changes).
Copy the contents of the NOOBS_vX.zip file onto the SD Card. In windows right-click on the file and select Extract All…
Use Browse… to Locate your SD Card drive and select it as the location to extract the files to.
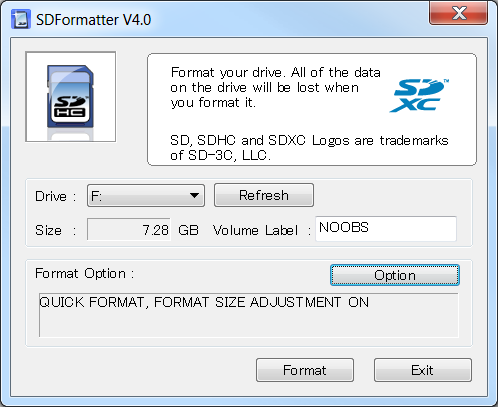
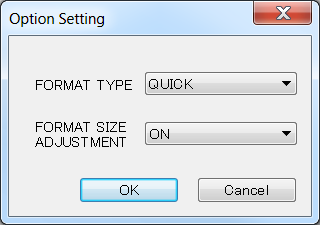
NOTE: If you have used the SD-Card before (i.e. for a previous Raspberry Pi installation) and need to clear any old partitions, use SDFormatter (~6Mb).
Ensure you set Format Size Adjustment (this will remove all the SD-Card partitions which were created previously).
You can also use this tool to return an SD-Card to suitable state to use again with cameras etc.

When it has finished copying, the root (top directory of the SD-Card/directory you are working in) should contain the following:
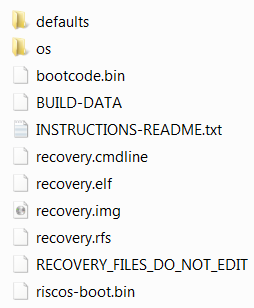
This may vary slightly with different versions of NOOBS and the icons displayed may be different on your computer.
Obtain noobsconfig
Obtain the noobsconfig files:
Download noobsconfig.zip
The zip file contains a matching structure to a full NOOBS installation (including a selection of different os directories each containing a modified version of the partition_setup.sh).
/os
customise.sh
/os/Arch/partition_setup.sh
/os/data_partition/partition_setup.sh
/os/OpenELEC/partition_setup.sh
/os/Pidora/partition_setup.sh
/os/Raspbian/partition_setup.sh
/os/RaspBMC/partition_setup.sh
Extract all these files into the root directory of the SD-Card (or working folder) and confirm replacing any of the partition_setup.sh files which are already present.
NOTE: Each of the
partition_setup.shfiles are just modified versions which call the newcustomise.shfile at the correct point in the NOOBS installation process. See the The Nuts and Bots section later which explains how it all works.
Creating a basic recipe file
Now everything is setup with noobsconfig, we are ready to create our first recipe file!
To start we shall keep it simple and just demonstrate noobsconfig in action. After that you can try out another example or experiment with your own setups.
For this example we will use the Raspbian distribution, so locate the os/Raspbian directory located on the SD-Card.
You will need to create two new files (one for each of the partitions we are going to insert files into), named as follows:
Raspbian_root.txt
Raspbian_boot.txt
These files will contain our file source and destination list for the root and boot partitions (this will instruct noobsconfig what files (ingredients) we want to use from our SD-Card and where to put them.
#Noobs config file for Raspbian_root (DateOfEdit)
#------------------------------------------------------
#Format is: filename destination attributes user group

#Copy the Noobs config txt files to home directory for reference
Raspbian_boot.txt /home/pi
Raspbian_root.txt /home/pi

#------------------------------------------------------
#End
#Noobs config file for Raspbian_boot (DateOfEdit)
#------------------------------------------------------
#Format is: filename destination attributes user group

Raspbian_boot.txt
Raspbian_root.txt

#------------------------------------------------------
#End
You can use these files as templates for your own recipes, these just insert a copy of themselves into the pi user’s home directory and the root of the boot partition (accessible on the Raspberry Pi through cd /boot/ command). I feel this is good practice as it will remind you what settings you used when you installed (even if you have changed the original recipe files in the NOOBS partition).
NOTE: Windows text files created using Notepad have different line-ending characters to those used and created using the Raspberry Pi (UNIX format).
Therefore it is highly recommended you use a different editor which supports both formats when working with files which are to be used on the the Raspberry Pi (for example the freeware program Notepad++). While noobsconfig does support non-UNIX format recipe files, it is recommended the UNIX/OSX end of line settings is used (in Notepad++ this is under edit->EOL Setting->UNIX/OSX).
The recipe taste test
You can now insert your SD-Card into your Raspberry Pi, connect up your screen/keyboard etc and power it on. You should find that NOOBS starts up as normal and you can select the standard selection of distributions.
Note: If you are not using a HDMI display or it isn’t detected then press keys 1, 2, 3 or 4 to switch between different display modes (1=HDMI, 2=HDMI safe, 3=PAL, 4=NTFS).
If you know you will need a particular type of display you can adjust the
recovery.cmdlinefile (again use an editor like Notepad++ which will keep the UNIX format).You will need to add
display=Xat the start of the command line (where X is the display typ number you need i.e. PAL).runinstaller quiet vt.cur_default=1 display=3 coherent_pool=6M elevator=deadlineUPDATE: NOOBS 1.3 has a bug where this setting is ignored, it is expected this will be fixed in NOOBS 1.4
If you now continue to select Raspbian (and if desired the Data partition) and install as normal, NOOBS will extract and install Raspbian onto the SD-Card.
Following installation it will reboot and load raspi-config (a utility that normally runs post-install to allow you to adjust keyboard settings, change the user password etc.), do what you normally do here and exit (or just skip it – you can rerun it later using sudo raspi-config). The Raspberry Pi will then reboot another time and load Raspbian.
Login as normal (the default username for Raspbian is pi and the password is raspberry). You will find that when you list the directory contents, our recipe files will be displayed (~ is a shortcut for the home directory):
ls ~
Also, located in the boot partition (mounted automatically in /boot/:
ls /boot/
If you’ve had enough of your customisation from your recipe file, simple delete or rename it and next time you have have a standard installation!
What’s next?
We have just shown how we can quickly reconfigure NOOBS using noobsconfig to automatically bake our own customisations to a distribution. While in this example we have just inserted some benign text files, we can do a lot more by changing the system files and controlling what scripts and programs are run on power up and login.
Be sure to see how to create additional flavours so you can keep working setups separate from experimental ones.
The Nuts and Bots
The customise.sh and partition_setup.sh files
The noobsconfig version of the partition_setup.sh file has the same instructions as the standard NOOBS file, except the following additional line:
if [ -e /mnt/customise.sh ]; then /mnt/customise.sh; fi
This causes the customise.sh script (which is located in the root of the SDCard) to be run as part of the NOOBS installation process and where all the magic happens.
The retro.sh script file isn’t used during a NOOBS install, but can be used to apply the same customisations afterwards.
When a NOOBS installation is started, the customise.sh script will look for the relevant file which will contain the list of our customisations.
Within the context of the Pi-Kitchen, these txt files will be referred to as recipe files (since effectively they will list the ingredients and also how they are mixed/located in the final installation).
The Recipe files
The file used will be named as follows:
- It will match the distribution and flavour name selected (matching the
os/namefor exampleRaspbian, and as listed inflavours.json). - Then the partition name (as listed in the
partitions.jsonfile).
e.g. 1 – For a Raspbian distro (located in the os/Raspbian folder) we will have two files as follows:
Raspbian_boot.txt– for files we want to put into the boot partitionRaspbian_root.txt– for files we want to put into the root partition (this is the main partition the system is installed on and contains the user’s directory etc)
e.g. 2 – For the Raspbian - Boot to Scratch flavour of the Raspbian distro. The files will be:
Raspbian_-_Boot_to_Scratch_boot.txtRaspbian_-_Boot_to_Scratch_root.txt
The recipe will consist of a list of source files (referenced from the location of the actual recipe file – i.e. the directory of the distribution /os/Raspbian/) and their target destinations (referenced from the root of the partition – i.e. the pi user’s directory is /home/pi). If no destination is given then the file will be placed in the top directory of the partition.
We can also specify particular attributes (as supported by the sudo chmod command) as well as the owners (user and group, as supported by the sudo chown command). By default, files are set as xxxx pi pi.
The recipe files support comments marked with # characters at the beginning of a line, which will be ignored by the noobsconfig scripts. This allows us to clearly comment our recipes and organise them into suitable sections.
Troubleshooting
Zero Sized SD-Card Issue
Problem: This issue is when you start NOOBS it reports it is unable to resize the partitions or it shows there no space available.
Fix: Often occurs with SD-Cards which have been used with Android (for example in a mobile phone).
Performing a format (with Format Size Adjustment enabled) as described above should always resolve this issue.

Notepad++ link should be changed to https://notepad-plus-plus.org/
Many thanks for spotting it!