
Guide To…Direct Network Connection (Fixed IP address)
Raspberry Pi Remote Connections – Without A Network!
This version of the guide has been superseded since you can now use the Apple Bonjour service and the Raspberry Pi hostname instead.
See Guide to…Direct Network Connection
This version of the guide allows you to set up the Raspberry Pi with a fixed local IP address, for some this is an easier solution, so I’ve kept this version available too.
No keyboard or screen available for your Raspberry Pi, but you have a laptop?
There are often times when a HDMI monitor is not available to use with your Raspberry Pi. In those circumstances it can be very useful to remote connect using a nearby network and a laptop (see the Guide to…Remote Connections). However, sometimes there isn’t a network available either!
So how can we make use of a laptop screen and keyboard when there is no network?
As discussed previously (in the Guide to…Remote Connections), there is the option of using a (console) TTL-serial cable, however this only provides rather slow access. The serial connection won’t support X11 (which as we have seen, allows us to run graphical programs too), and you won’t be able use VNC or shared folders if you have them setup.
The answer is a simple network cable!
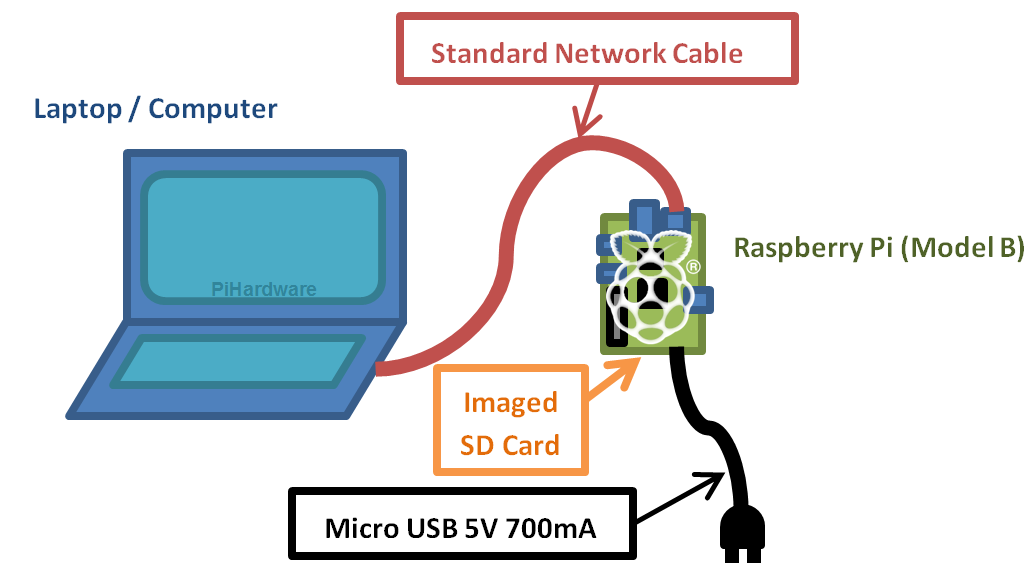
Connect and use your Raspberry Pi with just a Network Cable, a standard Imaged SD Card and Power!
It is advisable to set this up before you need it so you can be sure that it is configured and working correctly. As long as you have an SD-Card reader available, you can switch between the configurations using a laptop (or directly on the Raspberry Pi if you have a screen/keyboard at the time).
Remember if you need the wired network for your computer (i.e. to get internet) then you shall have to make a choice about which one you wish to use (or get an extra network port by adding a USB network dongle). If you use wireless connections, then you can still have both!
Any standard network cable should be suitable (needs to have a male RJ45 connector on each end), most cables available will be fine for our needs.
Note: You can use a normal network cable since the Raspberry Pi LAN chip is smart enough to reconfigure itself for direct network connections (in the past older computers would have needed a special “cross-over” cable).
Note: These instructions are only applicable to manually installed installations (i.e. those which are imaged directly using SDimager rather than using NOOBS. Unfortunately, if you use NOOBS the OS boot partition is moved and is no longer directly accessible from windows. You will need to either image your card manually or use a linux computer/LiveCD/Virtual Machine to access the OS boot partition and edit the cmdline.txt file directly.
You can also use the Pi-Kitchen, see Recipe 001-Direct Network for more details.
I’ve also created a cut-down version of the instructions for more advanced users who won’t need all the details:
In A Nut Shell…Direct Network Connection
How to use a direct network cable
What are we trying to achieve?
A good way to remotely control a Raspberry Pi is to connect it to a network and use one of the methods discussed in the Guide to…Remote Connections. This will provide access to the terminal, by usig SSH, even the ability to view the desktop using VNC, or the ability to run graphical programs as if they were running directly on the laptop itself (see below for X11 Forwarding). We just need to make the network link work directly without requring a full network setup (with Router etc).
Making a network connection work
Normally, if you take a Raspberry Pi and directly connect it to a network, it will attempt to automatically find an IP address (see bottom of the page for information about IP Addresses and what they are) by requesting one from your Router or other device running a DHCP server (a protocol which automatically deals out addresses to computers as they attach to a network).
However, if you connect the Raspberry Pi directly to another computer, not a lot will happen. The Raspberry Pi won’t get an IP Address since there isn’t a DHCP server to talk to (it can’t talk to anything other than the laptop).
Other computers will often give themselves a default address (in the address range 169.254.0.0 – 169.254.255.255) but the Raspberry Pi doesn’t do this (yet). Besides even if the Raspberry Pi did, we would still need to know what address it had picked to be able to connect to it!
To get around this, we have to give the Raspberry Pi a fixed IP address (i.e. we tell it what it’s IP Address should be so it doesn’t have to wait for one).
There is just one complication to this, and that is if your laptop is configured to a fixed IP too. At first this may not seem like a problem, since if both IPs are fixed then we will know the address of both computers every time.
However for them to be able to talk to each other directly, they need to have similar addresses (at minimum the first number should match, but we shall match at least the first 2 in this case to work with default network settings). For more information on this, see the section at the bottom of the page about SUBNETs.
Step 1 – Find the Laptop’s Network Settings
Before we power up our Raspberry Pi, we can have a look at the network settings of the computer we are planning on connecting to and determine if the address is automatically allocated or fixed.
Windows Instructions:
- From the Start Menu, run the “Control Panel”.
(Windows 7/Vista) Open “Network and Sharing Center” and click on “Change adapter settings” on the left side.
(Windows XP) Open “Network Connections”
- Find the item which relates to your Wired network adaptor (by default this is usually called “Local Area Connection”).

Locate the Wired Network Adaptor “Local Area Connection”
- Right-click on it and open “Properties”.

Network Properties Window, find the TCP/IP Entry
- Select the item which is called “Internet Protocol (TCP/IP)” or “Internet Protocol Version 4 (TCP/IPv4)” if there are two (the other is Version 6), and open the “Properties”.

Wired Network Adaptor is configured as Automatic
Hopefully, the IP Address will be set to “Obtain an IP address automatically”. If not don’t worry, just take a note of the IP address and Subnet Mask set here (you may find the rest of the information useful to keep, but we won’t need it this time). If you know what you are doing, you can change this setting to automatic, or you can leave it alone (we shouldn’t need to adjust it as long as we know the IP Address).
Mac and Linux:
You will need to locate the settings for your wired adaptor and check to see if the IP Address is configured automatically, or fixed to a specific value.
To get to network settings on Mac OS X:
1) Load System Preferences.
2) Click Networks.

(MAC) Wired Network Adaptor is configured as Automatic
Step 2 – Setting the Raspberry Pi’s IP address
Option 1: Quick Setup / Setting up when you don’t have a monitor
This quick method skips all of the testing which can be performed if we have a Raspberry Pi running with a monitor and keyboard attached. If you run into problems, then follow the steps in Option 2, to test the network settings.
1. Ensure the Raspberry Pi is powered off, and remove the SD-Card.
- Insert the SD-Card into a card reader and plug it into your laptop.
- Find the drive and you should find several files on the Card (note it a lot smaller than you’d expect since it is only the boot section of the Card (the rest is hidden)).
- Make a copy of cmdline.txt and rename it cmdline.normal
- Edit cmdline.txt and add the IP address at the end (be sure you don’t add any extra lines).
For network settings where the IP address is obtained automatically, use an address in the range 169.254.X.X (169.254.0.0 – 169.254.255.255):
ip=169.254.0.2
For network settings where the IP address is fixed, use an address which matches the laptop/computers address except the last digit.
ip=192.168.0.2
Ensure you take note of this IP address (you will need it every time you want to directly connect to the Raspberry Pi).
- Make new copy of cmdline.txt and rename it cmdline.direct
- To swap between configurations, just replace cmdline.txt with either cmdline.normal or cmdline.direct (or use the commands in Option 2 to do it directly on the Raspberry Pi – the change will take effect next time you power up)
- Return the card to the Raspberry Pi. Attach the network cable attached to both the computer and Raspberry Pi and power up.
NOTE THE FOLLOWING:
- You will need to wait for your computer to finish detecting the network settings (you may see a small networking icon flashing in your system tray while it does, or open up the network settings to see when it has finished and has an IP address) – it can take around 1/2 minute. Your computer may report the connection as “limited or no connection” when connected to the Raspberry Pi in this way, this is normal as indicates it is a direct computer to computer connection rather than a standard network.
- If you forget or decide not to plug in the network cable, the Raspberry Pi will wait 2 minutes (or until you connect the cable) before completing it’s start-up (so if you only have a keyboard and monitor attached, you need to wait!).
- If you are using multiple wired network adaptors (i.e. Using an extra USB-LAN dongle) on your computer you may find you have to unplug the other network cable and reattach afterwards (my Windows XP machine needed this before it would connect through the direct link).
Option 2: Set-up using a monitor and keyboard (i.e. before you really need it):
You will now see that having a keyboard and monitor available at this stage is helpful for when we set this up, as we can test each step.
- Boot up the Raspberry Pi and plug in the network cable to both machines.
- When the Raspberry Pi has booted ensure you log in and open the terminal if not already open.
Type the following:
hostname -I
You will probably find that nothing is shown, as this is trying to show you the current IP address (which is not allocated yet). If it does show something, then you may have already have a fixed IP address (if you do take note of it in case you need to put it back later).
- Now set the new address as follows:
For network settings where the IP address is obtained automatically, use an address in the range 169.254.X.X (169.254.0.0 – 169.254.255.255):
sudo ifconfig eth0 169.254.0.2
For network settings where the IP address is fixed, use an address which matches the laptop/computers address except the last number.
sudo ifconfig eth0 192.168.0.2
- We can check this has worked by rechecking the IP address:
hostname -I
You will see we now have the IP address set.
We should now be able to “ping” the laptop.
- Find the laptop address (if it wasn’t a fixed address) by returning to the list of Network Adaptors in windows and double clicking on the icon to see it’s “Status” (don’t worry about the warning of “limited or no connection”).
Then select the “Support” tab and then “Details”. You should see the laptop’s IP address.
ping 169.254.0.1
We should get lots of responses (the laptop is responding the Raspberry Pi through the network cable)! Ctrl+C to stop that. (If you didn’t then double check your connections and the IP addresses you are using).
As mentioned before, the new IP address will be lost when we reboot, so we need to ensure it is set every time we boot (or at least every time we want it to be when we boot).
To do that we can edit the “cmdline.txt” file which is located on the boot partition of the SD Card.
- Make a copy of the file, with the following command:
sudo cp /boot/cmdline.txt /boot/cmdline.normal
- Next edit the original file using nano:
sudo nano /boot/cmdline.txt
At the end of the long line, add the following (you will need to add a space between the last item and “ip”:
ip=169.254.0.2
Ctrl+x and y to save and exit.
- Make a copy of this file too:
sudo cp /boot/cmdline.txt /boot/cmdline.direct
- You can now reboot the Raspberry Pi (sudo reboot), and next time the IP address will be automatically set.
- To change between configurations, simply use the following commands (just remember to edit /boot/cmdline.direct if you need to change the IP address in future).
sudo cp /boot/cmdline.normal /boot/cmdline.txt
sudo cp /boot/cmdline.direct /boot/cmdline.txt
Summary
Now you should be able to do most of the things you would normally do when connected to a network. It is even possible to use this direct network link to share your laptop/computer’s internet connection (if it is connected via Wifi for example), although I’ve not needed to do this yet.
One VERY useful thing to do is to set up “Putty” and “Xming” to allow you to control the terminal and graphical programs directly from your laptop/computer.

Scratch running nicely inside a window using X-11!
See the main Guide to…Remote Connections for links for how to set-up VNC and shared folders, and X-11 on other computers.
Step 3 (recommended) – Install Putty and Xming Server (for SSH and X11)
I am assuming you are using the latest version of Raspbian which has SSH and X11 Forwarding enabled by default (if not see the bottom of this post to enable them if things don’t work).
1. Install and run a X-Windows server on your computer
Download and run http://sourceforge.net/projects/xming/ from the Xming site.
Follow the installation, including installing “Putty” if you don’t have it already. You can also download “Putty” separately from http://www.putty.org/
An alternative X-Windows server is available called mobaxterm, this provides a little more control, keeps your X-Windows together and handles your sessions etc. You can get it from http://mobaxterm.mobatek.net/. (Thanks to Mike for this tip).
2. Ensure your SSH program (Putty) has X-11 enabled.
In the PuTTY configuration, find “Connection”, “SSH”, “X11” and tick the check-box for “X11 forwarding”. If you leave the X display location blank, it will assume the default “Server 0:0” (you can confirm the server number by hovering your mouse over the Xming icon in the system tray when it is running). You can save your set-up within Putty so you will won’t have to do this each time.

Putty Configuration for X11 Forwarding
3. Enter the Raspberry Pi’s IP Address

Putty Configuration for given IP
Enter the IP Address of the Raspberry Pi in the Session settings above (you may also find that you can use the Raspberry Pi’s hostname here instead (default: raspberrypi)).
Save the setting using a suitable name (RaspberryPiDirect) and press “open” to connect to your Raspberry Pi. You will likely get a warning pop-up stating you haven’t connected to the computer before (allows you to check you have everything right before continuing).
All being well, you should be greeted with a prompt for your username and password (remember the defaults are pi and raspberry).
4. Using X11 and Xming
Ensure you have Xming running, by starting the Xming program from your computers start menu and then in the terminal window, type a program which normally runs within the Raspberry Pi desktop (such as “leafpad” or “scratch”). Wait a little while and the program should appear on your computers desktop (if you get an error you have probably forgotten to start “Xming”, so run it and try again).
- If you want to run an X program, but still be able to use the same terminal console for other stuff, you can run the command in the background with &:
i.e. leafpad &
Just remember that the more programs you run, the slower everything will get. You can switch to the background program by typing “fg”, check for background jobs with “bg”.
- You can even run a full desktop session through X-11, although it isn’t particularly user-friendly and VNC will produce better results. To do this you have to use “lxsession” instead of “startx”.
- If you get the following error (or similar) when running PyGame or Tkinter scripts:
_tkinter.TclError: couldn't connect to display "localhost:10.0"
Use the fix below:
cd ~
sudo cp .Xauthority ~root/
More details and links are in the main Guide to…Remote Connections.
Additional Information / Troubleshooting
- To switch on (or off) SSH you can access raspi config (just type “sudo raspi-config” from the terminal) and select SSH in the menu (it seems like SSH is already enabled by default for some distros).

- Enable/Disable SSH via Raspi-config

- Ensure X-11 forwarding is enabled on the Raspberry Pi (again, a lot of distros now have this enabled by default).
Use nano with the following command:
sudo nano /etc/ssh/sshd_config
Look for a line in the /etc/ssh/sshd_config file which controls X11Forwarding and ensure it says (with no # before it):
X11Forwarding yes
Save if required (ctrl+x,Y, enter), and reboot:
sudo reboot
Using cmdline.txt for Other Network Settings
The ip= command-line option allows us to specify the network settings when the “kernel” is loaded (the core of the linux system), it’s full options are in the following format (allows us to set every aspect of the network if required):
ip=<client-ip>:<server-ip>:<gw-ip>:<netmask>:<hostname>:<device>:<autoconf>
More details of what each part means and other kernel options is detailed in section 2 of this kernel documentation.
Easy Changing with a Simple Script:
The following script will prompt to allow you to change your settings (just type ./switchip.sh to run).
To create the file, you can use nano:
nano switchip.sh
Just press ctrl+x and y, to save and exit when you are done.
switchip.sh
#!/bin/sh

#Function to swap to Direct IP Address
direct () { sudo cp /boot/cmdline.direct /boot/cmdline.txt;}

#Function to swap to Normal Automatic IP Address
normal () { sudo cp /boot/cmdline.normal /boot/cmdline.txt;}

# Menu using case-esac
echo "Select IP Address? Use Direct or Auto or Keep (d/a/-)?"
read answer
case $answer in
 d|D) echo Use Direct IP;direct;;
 a|A) echo Use Auto IP;normal;;
 *) echo Keep - No Change;;
esac

echo cmdline.txt
echo ____________
cat /boot/cmdline.txt
You could even extend this to allow you to setup fixed IP addresses for different networks, so you can always be sure you can find your IP and connect correctly.
What is an IP Address / Hostnames / Pinging / Subnets?
An IP Address is like your phone number or post code, it simply allows other computers to find that particular computer in the network and ensure any messages it sends goes to that one in particular.
Often, IP Address’s can be replaced with hostname’s so that we can ask for a specific computer without knowing all the numbers (like the contacts list on your phone, the computer looks up the name and uses the number for you). For instance, http://www.google.com, is a hostname, where it’s IP address is 173.194.45.49 (probably depending on where you are). We can “ping” the address using the following command, which simply sends some short messages to see if there is another computer on the other side to respond to them.
ping www.google.com
or:
ping 173.194.45.49
Subnets:
Networks use subnets to help handle the fact that there could be a HUGE number of computers on a network (like the internet) and it would be impossible for a computer to listen to and respond to any computer in the address range 0.0.0.0 to 255.255.255.255.
To handle this, networks will use a subnet mask, this ensures that a computer only needs to respond to computers with are within the same SUBSET, which is defined by the SUBNET MASK setting.
The mask is a series of flags which defines which range of addresses the computer will respond to (by filtering out any which are not within the allowed range):
255.255.255.0
Means it will respond to computers which have IP addressing matching at least the 3 first numbers. So a computer with an address of 192.168.1.90 and subnet mask of 255.255.255.0 will only talk to other computers with addresses in the range 192.168.1.0-192.168.1.255 (except 90 of course!). Large networks often use SUBNETs to split up larger networks into sections so that they run more efficiently.
Note: You will not be able to set the SUBNET MASK to wider than 255.0.0.0. The Raspberry Pi defaults to a subnet mask of 255.255.0.0, which is perfect for most situations.
Trouble-shooting:
Steps to check:
1. Check the IP address which get set on both machines (both should be in range 169.254.x.x).
On RPI use one of the following commands:
hostname -I
ifconfig
On PC use the following (or look it up from the Network & Sharing Center and look at the adaptor properties):
ipconfig
- If this fails, check the cmdline.txt file is right/cable connected etc. You can use the following to force the IP address on the RPI (for testing the rest – but this won’t be set next time you reboot):
sudo ifconfig eth0 169.254.0.2
- Check you can ping each of the addresses from the other computer (where 169.254.0.xxx should match the computer you want to talk to). Test both directions.
ping 169.254.0.xxx
- If this fails, check PC’s firewall and disable wifi (sometimes the ping command will try using the PC’s wifi instead)
- Check you can connect via SSH (using putty)
- This should work if you can already ping the other machine (it is unlikely to work if you can’t ping it).
References:
Thanks to fellow MagPi – Colin Deady for testing out on Mac for me.
Thanks to the following sites for providing various parts of the puzzle (in no specific order):
www.kernel.org – kernel documention
http://learn.adafruit.com/adafruits-raspberry-pi-lesson-6-using-ssh
http://people.arsc.edu/~murakami/xming/
http://jeremy-nicola.info/portfolio-item/ssh-x-forwarding-on-windows/
http://en.wikipedia.org/wiki/Subnetwork
http://en.wikipedia.org/wiki/Link-local_address
http://www.raspberrypi.org/phpBB3/viewtopic.php?f=29&t=22716
http://www.raspberrypi.org/phpBB3/viewtopic.php?f=27&t=24993
http://www.raspberrypi.org/phpBB3/viewtopic.php?f=32&t=26934
