
In A Nut Shell…Direct Network Connection
NUT SHELL VERSION
Raspberry Pi Remote Connections
Without A Network!
This is a ultra-cut down version of the detail Guide To…Direct Network Connection , if you run into problems or do not know anything about networks then follow that guide!
No keyboard or screen available for your Raspberry Pi, but you have a laptop?
The answer is a simple network cable!
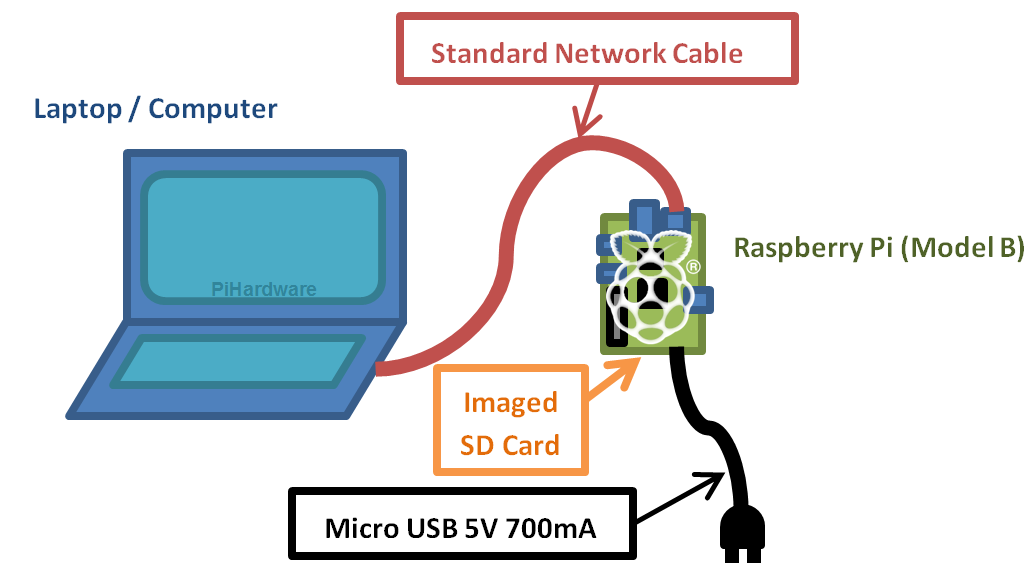
Connect and use your Raspberry Pi with just a Network Cable, a standard Imaged SD Card and Power!
Step 1 – Find the Laptop’s Network Settings
Before we power up our Raspberry Pi, we can have a look at the network settings of the computer we are planning on connecting to and determine if the address is automatically allocated or fixed.
Find Your Network Settings:

Wired Network Adaptor is configured as Automatic
Hopefully, the IP Address will be set to “Obtain an IP address automatically”. If not don’t worry, just take a note of the IP address and Subnet Mask set here or you can change this setting to automatic.
Step 2 – Setting the Raspberry Pi’s IP address
Edit your cmdline.txt file:
You can edit it directly on the Raspberry Pi:
sudo nano /boot/cmdline.txt
Or use an SD-Card reader on your computer (the file is in the root of the visible partition on the card – if you aren’t using NOOBS).
You will need to add the ip=x.x.x.x value to the end of the line (ensure you do not add any extra lines).
It is recommended you use a Linux compatible editor such as Notepad++ (http://notepad-plus-plus.org/) to make the change.
For network settings where the IP address is obtained automatically, use an address in the range 169.254.X.X (169.254.0.0 – 169.254.255.254):
ip=169.254.0.2
For network settings where the IP address is fixed, use an address which matches the laptop/computers address except the last one (assuming your netmask is at least 255.255.255.0 / 255.255.0.0).
ip=192.168.0.2
Ensure you take note of this IP address (you will need it every time you want to directly connect to the Raspberry Pi, although you might be able to use the hostname).
Step 3 – Finished!
Return the card to the Raspberry Pi. Attach the network cable attached to both the computer and Raspberry Pi and power up.
NOTE THE FOLLOWING:
1. You will need to wait for your computer to finish detecting the network settings and your computer may report the connection as “limited or no connection”.
2. If you forget or decide not to plug in the network cable, the Raspberry Pi will wait 2 minutes (or until you connect the cable) before completing its start-up (so if you only have a keyboard and monitor attached, you need to wait!).
3. If you are using multiple wired network adaptors (i.e. Using an extra USB-LAN dongle) on your computer you may find you have to unplug the other network cable and reattach afterwards (my Windows XP machine needed this before it would connect through the direct link).
___________________________________________________
See the main Guide to…Remote Connections for links for how to set-up SSH, X-11, VNC and shared folders.

[…] In A Nut Shell…Direct Network Connection […]
[…] Meltwater has done an extensive guide on communication with your Raspberry Pi via a network cable between the Pi and your laptop (or other machine). It’s quite long-winded, and for anything graphical it’s even longer with a lot of hoops to jump through, but if you need something like this, this is the best tutorial I’ve seen yet. Read the guide. If you know a fair bit about networks and installing bits and pieces, there is also a in-a-nutshell version. […]
[…] quick version of how to do it (basically, just recognising the IP address) assumes some prior knowledge, but for […]
There’s a much easier way to do this. Install the packages “avahi-daemon” and “avahi-autoipd” on your Raspberry Pis and they can set their own IP addresses and discover each other without needing any external servers. All you have to do is give a unique name to each computer. Perhaps these packages should be on the standard image?
These two packages implement the Internet-standard “zero configuration” protocols. I should add that this requires zeroconf support on both your laptop and your Pi. Since they were developed by Apple they’re already standard on Macs (where they’re known as Bonjour), but Windows probably needs them to be added. Last I checked, Apple had a free Bonjour package for Windows.
If your laptop runs Linux like mine, then you simply install these two packages there too.
The solution I needed had to be a out of the pi box solution. There are a number of things which could ease the setup by including it in the distro. Simply allowing detection of direct connections and setting the IP to 169.254.x.x range would give a quick start option, without anything else required (although the hostname part would need to work unless it is always set to the same 169.254.x.x address – not ideal).
Internet sharing is more difficult (manually you have to match the addresses), and may well better served by the apps you mention. I’m not a network guru, but needed a solution.
This does no seem to work for me. PuTTY says, “no route to host.” and never works. I’m on Linux (on my laptop). Could I be doing something wrong?
Ensure you are able to ping the address. Ensure both computers are using similar IP addresses (the same except the last number).
I can’t ping it. And I the IP’s are set up right.
“No route” means either that, or that there’s no ARP entry for the target.
On an Ethernet LAN, each node has two addresses: the 32-bit IP address (assigned by DHCP, manually configured or automatically set by Zeroconf) and the 48-bit Ethernet MAC address (usually set by the manufacturer). To find the MAC address of a another system, you broadcast a special Address Resolution Protocol packet with the target IP address, and the system with that address should respond with its address. Even if there’s a routing entry for the target network, if the remote host doesn’t respond to the ARP request you’ll get the “no route” error, usually after several unanswered pings.
You can look at your local ARP table with the commands
arp -a -n
or
ip neighbor list
That doesn’t work. ARP table doesn’t find the RPi.
if you have wifi enabled, try disabling that (as it may be trying to use that on the ping commands)
Seth, that’s what I meant — if the ARP query fails, eventually you’ll get the “no route” error even if an IP route exists for the target on your local computer. As a networking geek I understand why it happens, but it’s also misleading and should be changed to something like “target on local network not responding” or something like that because they’re two different problems with different solutions.
My suggestion was meant to distinguish between them; is it an actual lack of a routing entry or the lack of a response to the ARP query? The former has to be fixed on your local computer; the latter indicates that something is blocking packets between the two computers, with the most likely possibility being that the target is simply turned off or disconnected from your network.
Yes, if you can use Ethernet on both ends, do so and turn off wi-fi. Wifi is more involved with more things that can go wrong, so it’s always best to start with wired Ethernet on both ends. Once that’s working, then try WiFi.
Installing packages on the Pi is absolutely trivial, assuming it has a network connection. That’s always been the great thing about Debian Linux, the base for the Pi Linux distribution. You do it with two commands:
sudo apt-get update
sudo apt-get install avahi-daemon avahi-autoipd
The first updates the local catalog of available packages, the second installs the two Zeroconf packages. You only need do it once, and it actually takes less time than manually setting up the addresses each time. Because they’re so useful I put them on the Pi image I distribute to my students. You should be running apt-get update and apt-get dist-upgrade periodically anyway, to keep your system up to date.
If you’re talking to your Pi from a Linux system, also install these same packages. If you’re using a Mac, you already have everything you need. And if you’re on Windows, besides putty.exe you will need either Apple iTunes or Apple’s Bonjour for Windows: http://support.apple.com/kb/DL999. Again you only need to install them once.
Bonjour/Zeroconf is designed for this exact problem, and it’s almost always better to use the tool designed for your job than to do it by hand, over and over.
The method was required for a workshop, which didn’t have any keyboards or monitors available. Until the packages are set-up as standard in the distro it wasn’t an option to use them.
Certainly worth looking into though as a better long term solution.
Thanks.
So use wget or curl or whatever to grab the packages I mentioned and drop them on the SD card. Use your manual method to set up the network once, log in over the link thus established and install the packages using dpkg –install. Done.
Could they be installed onto the sd card in a macbook connected to the internet?
Unfortunately I don’t own a Mac so I can’t really support it.
The best method for configuring the RPi without a screen/keyboard is to use the Pi-Kitchen.
Before completing its* start-up.
Good catch! Updated Thanks.
Do you mind if I quote a few of your posts as long as
I provide credit and sources back to your webpage? My website is in the very
same area of interest as yours and my visitors would truly benefit from some of the information you provide here.
Please let me know if this okay with you. Cheers!
That is perfectly fine. Pleased that you find it useful, more than happy for the information to be shared and improved upon to help as many out as possible.
Thanks for asking! 🙂
Hi,
I found that this method doesn’t get the default gateway so you can’t use the internet on the device using the bridge e.g. a raspberry pi. Rather than putting the ipaddress into cmdline.txt instead adjust your interfaces file (it’ll probably be /etc/network/interfaces) to make your internet connection static like so:
auto eth0
iface eth0 inet static
address 192.168.0.253
netmask 255.255.255.0
network 192.168.0.0
broadcast 192.168.0.255
gateway 192.168.0.1
Where eth0 is the interface you wish to adjust and 192.168.0.253 is the static ip address you want the computer to have; it’s probably best to reserve it from the router just in case the dhcp automatically assigns the ip address to a different device (I purposely made it .253 as there is very little chance of dhcp assigning the address but probably best to reserve it just in case).
Admittedly this isn’t as easy as putting the ipaddress in cmdline.txt but it is more useful as you can use the internet (do not put the ipaddress in cmdline.txt when using this method as it will stop the interface from loading).
Regards
Paul
Which-ever works for you. The cmdline.txt method was selected due to my need at the time to adjust the settings without a screen (plus easier to undo, when re-joining a normal network).
You can also set the gateway for ICS on the cmdline.txt – but still need people to test it.
ip=x.x.x.x::y.y.y.y where x is RPi IP and y is PCs IP with ICS enabled.
See the WIP post waiting for testers:
can somebody make a video?
I keep meaning to, but have been busy on another project at the moment. Sorry.
Have you tried the super easy scripts? Yet to get feedback on if they are working for people.
The instructions on where to put the ip in cmdline.txt are kinda confusing. Seemed to easy to make the thing work.
Thanks for your feedback, I’ve added a small note to hopefully ensure it is clearer.
Thank you very much for providing this amazing solution. However, after I set up everything based on the steps above(In fact I try the detail version of the article as well), the connection between RPi and my laptop didn’t work!!! Could you please help me to set it up? Here are the detail of my set up.
Laptop system : windows 7
Wired Network Adaptor : Automatic
RPi system : 2013-05-25-wheezy-raspbian
ip setting in commandline file: ip=169.254.0.2
Putty and Xming have been installed and set up based on the steps in the detail version article.
But when I use Putty to connect RPi, it shows me “Network Error: Connection Time out”
Regards
Gemini
The first step will be to confirm that the RPi is being set with the IP address you are putting in the cmdline.txt file.
The check to see if you are able to “ping” the other computer (from the Pi to Laptop) and also the other way.
If that all works, then Putty should work (last thing could be that you have antivirus/security software set to block the putty program).
do not use notepad to add ip address as it adds a new line… insted use notepad++ or something.
Is it possible to configure the RPi to try a DHCP connection first, then (if it fails), use the static IP for a direct connection? I haven’t mucked around in the /etc/network/interfaces stuff enough to really know.
I imagine you would have to write a script to do that, and get that to start up on power-up. Although, many OSs will auto-detect that there is a direct link and allocate a fixed IP in the 254.169.x.x range (this is why you end up with one set on your laptop for example), there is no reason I know of why the RPi shouldn’t also do this (it just doesn’t as the distro doesn’t support it).
In many cases this would allow you to use the Raspberry Pi’s hostname, since both computers will be on the same IP range 254.169.x.x, and would allow no configuration direct links.
What kind of script would do that? I already have a startup script, but I don’t know how to force it to try DHCP, then a static IP.
By default have DHCP enabled, and use ping to test your connection (or hostname -I to see if you get allocated an IP address perhaps).
You can set a fixed IP for direct connection with the following command:
sudo ifconfig eth0 169.254.148.28
(although the IP address that gets allocated by the connected PC may be different each time, you may be able to ping it using its hostname).
If you need to re-enable DHCP you can use:
sudo dhclient eth0
Will probably take a bit of experimentation to get it right. If you do let me know and I’ll post it up if you like.
Install the avahi-autoipd package to get the service that automatically assigns your network a randomly chosen address in the 169.254.0.0/16 block and checks to ensure no one else is already using it. Install avahi-daemon so the Pi will respond to multicast DNS queries for the Pi’s IP address, be it manually configured, obtained by DHCP or by autoipd.
The avahi-autoipd sounds useful. Would be the kind of thing which would be helpful to have configured out-of-the-box.
Would the avahi-daemon work on direct connections, since there is no DHCP in that instance?
Yes, avahi implements the “zero configuration” protocols, which are designed for computers on small networks without services like DNS or DHCP. There are several parts, one (-autoipd) that self-assigns an address in the 169.254.0.0 block when a DHCP server isn’t available, and one (-daemon) that responds to multicasted queries for machine names of the form “name.local” when no DNS server is available. These are specifically designed for this situation, and there’s really no reason to resort to ad-hoc scripts and configurations.
The original purpose of the cmdline.txt solution was for a workshop where screens wouldn’t be available (and people were unlikely to have prepared for it). However if this could be included in/added to the standard image, it would make it a lot easier in such cases.
what os does the instructions assume the device is running on
Tested with Raspbian, although I would imagine any which have the cmdline.txt file will work in a similar way.
Let me know if you test with others and I’ll update the details.
tested with new version of wheezy-debain , connected pi to laptop via Ethernet stiil finding difficult to access the pi board
X.Org X Server 1.12.4
Release Date: 2012-08-27
X Protocol Version 11, Revision 0
Build Operating System: Linux 3.2.0-2-mx5 armv7l Debian
Current Operating System: Linux raspberrypi 3.6.11+ #538 PREEMPT Fri Aug 30 20:42:08 BST 2013 armv6l
Kernel command line: dma.dmachans=0x7f35 bcm2708_fb.fbwidth=656 bcm2708_fb.fbheight=416 bcm2708.boardrev=0xe bcm2708.serial=0xe576fe5 smsc95xx.macaddr=B8:27:EB:57:6F:E5 sdhci-bcm2708.emmc_clock_freq=100000000 vc_mem.mem_base=0x1ec00000 vc_mem.mem_size=0x20000000 dwc_otg.lpm_enable=0 console=ttyAMA0,115200 kgdboc=ttyAMA0,115200 console=tty1 root=/dev/mmcblk0p2 rootfstype=ext4 elevator=deadline rootwait ip=192.168.1.5
Build Date: 20 April 2013 05:19:09AM
xorg-server 2:1.12.4-6 (Julien Cristau )
Current version of pixman: 0.29.3
Before reporting problems, check http://wiki.x.org
to make sure that you have the latest version.
Markers: (–) probed, (**) from config file, (==) default setting,
(++) from command line, (!!) notice, (II) informational,
(WW) warning, (EE) error, (NI) not implemented, (??) unknown.
(==) Log file: “/var/log/Xorg.0.log”, Time: Wed Sep 25 23:25:16 2013
(==) Using system config directory “/usr/share/X11/xorg.conf.d”
please help me out ……
Is the issue connecting to the unit via ssh? (are you able to ping it?). Or is the issue using X11-forwarding?
Hello, I’m buying my other half a Raspberry Pi as a gift. He uses a macbook pro and we don’t have a separate keyboard, monitor etc. Am I right to think I can just get a networking cable and then he’ll be able to use the keyboard and monitor of his laptop? Just don’t want to give him the Raspberry Pi and be in a position that he can’t use it right away… also don’t want to buy an extra keyboard etc. Would this work? Thanks!
Hi,
Really hope your partner enjoys it and gets the most out of it, excellent present.
It is possible to connect 1st time without any extra hardware (other than USB+network cable), but I wouldn’t recommend trying as your first time (it can be tricky without any way to check things over if you have not done it before and “NOOBS” distro unfortunately makes it harder).
You still have some options, if you have a TV with HDMI then you’d just need a HDMI cable and keyboard then you should be able to set up the remote connection easier (and can use it directly too).
Just don’t forget to get a suitable USB power supply.
Once you do have remote connections working though, it is great to use like that (I typically use mine remotely over my network).
If you need more help then ask away. 🙂
Yes, but: if something corrupts the bootable image on the SD card in the Pi, you won’t be able to troubleshoot it. Also, he’ll be using the windowing system on the Macbook, not that provided by Linux on the Pi.
Thanks everyone. I’m going to get a keyboard and an hdmi cable then.
It’s definitely good to have the ability to use a keyboard and monitor even if you don’t use them often.
Yep, having a keybaord and HDMI screen is essential if you need to troubleshoot things. You can be sure that things will always go wrong when you can’t see the screen and can’t see what the problem is.
Always good to have access to a HDMI TV which you can use to sort things out when you need to, even if you use remote connections the rest of the time.
Right. And if you can’t keep a keyboard and HDMI screen handy (e.g., when you take the Pi somewhere) bring along a spare SD with a known-good system image so that you can at least get the thing going again if for some reason your primary SD card doesn’t boot.
I cannot edit that cmdline.txt on my WindowsXP ,what way I can do?
Please reply..
graceful !
If you are using NOOBS then you will have to use a virtual linux setup or a linux LiveCD, or another Raspberry Pi.
Alternatively, if you install a Raw Raspberry Pi image, then the cmdline.txt is visible on the SdCard.
Would you happen to know how edit the cmdline.txt using linux?
by using linux Live cd
There should be a text editor on there of some type, leafpad, or use nano from the commandline. You will probably find that it will detect several partitions, so you have have to look at a few of them to find which one it is in (should be in the root of the partition).
If you still have trouble let me know and I’ll try it with my card to give more details.
[…] Ligação RPi-PC sem Internet: https://pihw.wordpress.com/guides/direct-network-connection/in-a-nut-shell-direct-network-connection/ Ligação VNC e SSH: http://myraspberrypiexperience.blogspot.pt/p/setting-up-vnc.html Script de […]
I’ve inserted my SD card (which is not noobs, one I setup myself) into my laptop (running windows 7) and I have all my files on the card showing but I cannot see the cmdline.txt anywhere, any advice to what I am doing wrong I’d appreciate. Also, none of the commands work. I just get the “sudo” is not recognized as an internal blah blah you guys know the rest :). I do have multiple copies of different linux distros that I can boot up if that would make this process easier?
What files do you see on the SD Card?
If you can try using a linux distro then you will have much better access to the files on the card and also be able to confirm the partition layout using gparted.
Are you using Raspbian or is it a totally different distro?
I’m a total novice to all these things you mentioned. I have RaspBmc installed on Raspberry Pi and there is no cmdline.txt file on the SD card. Also I have ASUS USB-BT211 Mini Bluetooth USB dongle. My monitor, keyboard and mouse all connected to Windows 7 desktop. Every time I need to have access(add add-on, install, ….) I have to disconnect the monitor, Ethernet cable, keyboard and mouse from PC and connect them to Raspberry to do so. Can you please provide some direction on how I can take advantage of the Asus dongle to connect Raspberry to my PC and still be able to use the monitor, internet, keyboard and mouse to control it.
Look for enabling SSH access for RaspBmc over serial.
I’ve not tried serial coms via a USB bluetooth module, but you can certainly do it using a HC-05 bluetooth TTL module (which when you pair to a computer/phone will appear as a COM port).
Ok. I’m confused. I have an RPi & have used it successfully with a mouse, keyboard, & HDMI cable on my TV. The issue is when someone else is using the TV, I have no way to play on the RPi…
I would like to use my MacBook Pro, but can’t decipher how to make it work. I read Phil’s posts about how the Mac & RPi should have everything already but I don’t see that. Once I create a static IP address for the RPi, how do I connect to it on the laptop side? SSH? Or do I need to use a virtual machine & use Putty on the Windows side?
I don’t have a Mac but I believe ssh is built in.
Check out the Adafruit guide I linked to from the Remote Connections guide (https://pihw.wordpress.com/guides/guide-to-remote-connections/).
This will tell you about using a mac:
https://learn.adafruit.com/adafruits-raspberry-pi-lesson-6-using-ssh/using-ssh-on-a-mac-or-linux
Again, not sure about the X-server part for X-11 forwarding, but I’m sure it does it too (or you can VNC).
Also don’t forget you can do all the remote connection stuff by connecting the Pi to your router or with wifi too.
Right, if you plug both your computers (the Pi and your Mac) into your home network, then they can both get addresses by DHCP from your home router. If the SSH server is running on the Pi, then you can get a shell on it by opening up a terminal window on your Mac and running the SSH client command. The SSH server isn’t running by default on the Pi, but there’s an option under raspi-config to enable it that you only have to run once. You will have to know what IP address has been assigned to your Pi.
But it’s even easier if you do some more one-time work first. After you enable the SSH server, install the avahi-autoipd and avahi-daemon packages on the Pi. These implement the “Zeroconf” protocol standards originally developed by Apple as “Bonjour”. The first lets you do without a DHCP server; the Pi will still request one, but if it doesn’t get a response it’ll pick a random address in the 169.254.0.0/16 block and ensure no one else is using it. Avahi-daemon then answers requests from other computers for this address based on its hostname (the default is “raspberrypi.local”, but can be changed in /etc/hostname). This means you can run an Ethernet cable directly between your Pi and your Mac without even using a switch or router. (I really wish the avahi packages were installed by default in raspbian). If you have a DHCP server, then the Pi will use whatever address the DHCP server assigns instead of 169.254.xxx.xxx, but still respond to the name “raspberrypi.local”.)
I rarely connect my Pis to a TV unless I run something that really requires it, like a video player. I usually just use the command line. Programs that need X11 windows will automatically create them on my Mac desktop through XQuartz and SSH X11 forwarding.
Phil, excellent info, I’ll update when I get chance.
Certainly worth including as a Pi-Kitchen recipe so it IS built in during install (exactly what the Pi-Kitchen is for).
Will look forward to trying it out when I get time.
Thanks for the quick responses!! I’ll give the avahi-autoipd & avahi-daemon packages a try & use XQuartz to view the graphical programs like Python…
You’re welcome. Another thought: turn on IPv6. Just add the line “ipv6” to /etc/modules. This will give you another way to talk to your Pi if for some reason IPv4 addressing isn’t successful. Every IPv6 interface is required to have a “link local” address. It’s composed from the Ethernet MAC address, so it’s just there all the time and it’ll be returned along with any IPv4 addresses by the avahi daemon. Linux, OSX and Windows have had good IPv6 support for some time.
Yes, Mac OSX comes with ssh. It’s a command line program, so you have to launch a Terminal window. There is an X11 server for OSX called XQuartz. It’s no longer bundled with OSX but it was easy to find; I can’t remember where at the moment. You keep it running, and any X11 application that needs to open a window will do so right on your OSX desktop, just like any other window. With X11 forwarding through SSH, the application writing to your window can be running on the Pi.
OK. I got the network working using avahi-autoipd & avahi-daemon!! I can ssh into my RPi using only a network cable & the terminal window on my Mac! ssh also works using XQuartz & an X11 window. I can navigate the pi’s directory, run nano, etc.
Next, when I try to run an application on the RPi like leafpad, I get the error meltwater2000 talks about with X11 forwarding: Cannot open display.
I went into the text file on the pi & made sure X11 forwarding is enabled, but still can’t get it working…
Suggestions?
Okay, lessee… Do you have ForwardX11 and ForwardX11Trusted set to “yes” in your client’s config file? That would be in ~/.ssh/config, where the ~/ means “your home directory”.
I think both the client and the server have to agree before X11 forwarding can be turned on because it could conceivably be exploited. If someone broke into your Pi, they could spawn windows on your desktop that would look like normal application windows and possibly trick you into entering a password, etc. Of course, if it’s just your Pi connected directly to your Mac with an Ethernet cable, that’s kinda unlikely!
Note that you can enable and disable options like ForwardX11 on a host-by-host basis if you like. So you do not need to enable it for systems you don’t fully trust and/or systems where you only need to use a regular command-line shell. You can also turn compression on only for remote systems and turn it off for local ones on a fast link. SSH is an extremely versatile program, but it can take some time to get used to all the little features. See the ssh_config manual page for details.
I installed minibian which is a stripped down version of debian. Setting a static IP in cmdline.txt works but not when I set it in /etc/network/interfaces. My setup is a switch and a laptop and a Pi connected to the switch; no router, no DHCP server. Does anyone know what’s going on here?
I would guess that minibian does not read the cmdline settings. Best check with the author of minibian.
Could you explain me which are the advantages using cmdline.txt for setting the ip address and not to use network/interfaces file?
thanks in advance
Originally the cmdline.txt file was accessible directly on the SDCard, however NOOBS changed that.
I still like using the cmdline.txt since it is typically only a temporary setting I want to apply, so easy to adjust.
OK. Thanks for your response. Another question in this context. I’ve two raspberries pi: the main one or raspi1 that has 2 network interfaces (wlan from a router -dhcp with 192.168.1.1 as gateway, I can access internet via wifi) and other eth0, for instance 192.168.2.30, to connect a secondary raspberry pi or raspi2; this raspi2 has a static eth0 interface (i.e. 192.168.2.31). I can access internet on raspi1 and I can communicate between two raspi’s with ethernet (ping, ssh, etc.). But I also want access internet (throw raspi1 wifi) on raspi2. How can I do it?
Interesting, I’ve not tried that before.
In theory you would set the IP address of the internet connected RPi as the gateway on the 2nd one. See the https://pihw.wordpress.com/guides/direct-network-connection/super-easy-direct-network-connection/ guide which tells you how to set that.
However I’m not sure if you have to set something to allow the internet to be shared too.
BTW – tried many many tutorials and this is the only one that worked!
Question – any tips on how I might then share my mac’s wifi with my directly connected rpi?
I don’t have a mac but I believe there is an option to set internet connection sharing, then you should set the gateway on the Pi as the IP address of the Mac.
[…] In A Nut Shell…Direct Network Connection […]
Great tutorial! But you must notice, that versions of Raspbian released after 2016-11-25 have SSH disabled by default. It can be enabled by creating a file with name “ssh” in boot partition.
Thanks for letting me know, I didn’t know they had changed it!