A large aspect of the “Learning through Practical Thinking”(TM) concept used in the design of my hardware kits is the fact that you construct the kit yourself.
As many people have reported, the kit includes a printed User Manual which includes “extensive” instructions on each and every step required to build up the pile of components into a fully working unit. By getting close up and personal with the components you can’t help but learn more about them and a far greater sense of “ownership” is created (ownership is one of the key drives the Raspberry Pi foundation felt was important for kids, ensuring they were cheap enough for kids to own them).

Inside the user manual (background on how the circuit works)
A major aim of PiHardware is to encourage people to pick up a soldering iron and have a go, even if they have never touched a soldering iron before (careful please – one end is hot!).
It can be very frustrating for beginners to solder, particularly at first since it seems like an impossible task of holding everything in place, moving them in the right way and at the same time avoiding over-cooking things!
So for those who are finding it particularly hard, I thought I would share with you some of the tips which I sent to one VERY determined customer, called Paul (who has been kind enough to allow me to share his story).

Paul’s 1st Attempt Top
As part of the instructions I refer to the following soldering guide (By Mitch Altman and Jeff Keyzer). It has also been featured on the Raspberry Pi site too, and gives some useful information about soldering:
TOP TIP: Always use safety glasses when soldering!
It is something which everyone should get into the habit of doing since hot solder in an eye is not a good thing. It doesn’t take much to bend a wire the wrong way and flick some hot solder into the air, or to cut a component leg and launch it at high speed. You can choose to be unlucky once or you can choose to be careful every-time.
I feel my soldering skills are quite good but it wasn’t always like that, it is something which I’ve picked up over time and now it just comes naturally (soldering when you get used to it is very relaxing – and I don’t think that is just the flux fumes). There is no magic here, you simply get used to how to hold things, when the solder is hot enough and you get a feel for how long you need to hold the heat on.
The story of Paul:
Paul sent me the following pictures of his soldering (which in all fairness I thought was rather good) – there was only a few points which looked like a possible problem). I’ve seen far worse, including from people who have been soldering for many years (some boards I’ve yet to work out what the circuit was under it all).

Paul’s 1st Attempt Underside
As you may well appreciate, it only takes one small bit to be wrong and everything won’t work as it should (only a few of the LEDs worked).
However, Paul was thoroughly determined to improve his soldering and rather than giving up (in true Raspberry Pi spirit he asked for some help – remember it is a learning tool and the community will help those who ask nicely – I always do my best to help where I can).
He only asked me a few basic questions, but I wanted to help as much as possible so I returned with a lot more detail.
_____________
The kit I use is all fairly standard (and most importantly isn’t expensive specialised equipment):
Note:
I’ve used images from cpc.farnell.com (which link to their products) this is just as an example, not where I purchased them from.
– Unleaded solder
One question Paul asked was regarding using leaded or unleaded solder and if it made a difference.
Although I did used to use leaded, I figured I should be using unleaded particularly if people are handling them at workshops – probably minimal difference to people but no reason why not. There isn’t a lot of difference when it comes to using it (I think it has improved a little since I 1st tried it a few years back), I think it may have a slightly different “skin” as it melts though (goes a little lumpy before melting fully), but it is a minimal effect. Unleaded solder may eat away at the soldering tip a little faster though (or at least it did with my older soldering tip).
What will really help is to ensure you are using small gauge electronics solder (0.7mm), rather than thick solder intended for electrical work.
– Extraction / Ventilation
When soldering various fumes will be released, while in small quantities these are fairly harmless it is always recommended that you avoid inhaling them where possible. Ensure that you work in a large well ventilated room, or obtain a fume extractor/filter (small ones are available from Maplins (http://www.maplin.co.uk/solder-fume-extractor-49000).
– Soldering iron
I use an Antex XS25 soldering iron, which is 25W and not particularly expensive or high powered. However, I do use a small tip suitable for electronics (it came with a big fat one which I have never used).
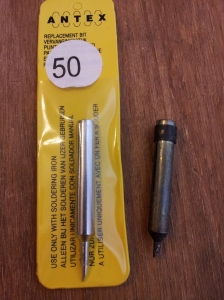
New verses old soldering tip
You can see from the picture, that my old small tip had been dissolved over the years (the unleaded solder may have finished it off, not sure if they mix well) so I had to get a new one (this made a massive difference as the old one would keep oxidising between joints). Get into the habit of putting some solder back on the tip before you switch it off, this means the solder will oxidise rather than the tip, hopefully making it last longer.

Antex XS25 soldering iron
– Cleaning the board/components
Some wirewool is useful here, while most times you can avoid having to clean things (if the components have not been laying in a box for years), it can help if you have wirewool to rub any dirt (oxide) from the board and components. The cleaner they are, the better the solder will flow and it will make better contact for heating. You can also get flux in liquid form/in pots, which will clean it chemically, although it isn’t often you’d need to do it, it can help make nice joints.
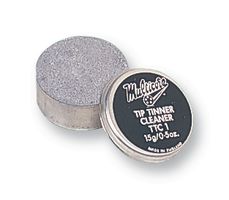
– Cleaning the tip
While a lot of places suggest using water (distilled water or at least from a boiled kettle) and a sponge, I prefer using a wire ball. The problem I find with water is that it will cool the tip, which means you have to wait for it to heat up again if it needed a lot of cleaning.

Tip Cleaner
You can also get pots of flux (the cleaning stuff inside the solder) which you can put the tip of the iron into, but the flex within the solder should be enough in most cases.
Soldering Flux
Additional Tips:
There are a few things which you may well find will help you out:
Tinning –
This is where you apply a little bit of solder to the tip of the iron before you do any soldering. You melt a small bit of solder on the tip, which allows the flux inside to clean off the dirt (the tip will get dirty as it cools, since heat allows it to oxidise quicker than it would normally). Wipe off the excess, and then you can put a tiny tiny bit of solder back on (this gives a small surface of solder which will press onto the thing you are heating up, allowing far better contact).
Timing –
This I think comes with practice more than anything. When soldering you are heating three things at the same time (the board, the component leg and the solder), if one isn’t the right temperature, then things won’t go well.
You’ll need a little judgement here, but typically the component legs won’t take long to heat up, and we want to avoid excessive heat on them, so we aim to heat them up quickly and make the joint.
The board, can take longer to heat up, but shouldn’t have too much trouble if we take longer to heat (you are only likely to damage it if you are heating for several minutes or say you have a small section of stripboard cut either side i.e. it heats up the glue holding the track onto the board).
Finally, the solder, this will melt very quickly (as long as the tip is tinned/slightly wet with solder).
Positioning –
Therefore, I usually solder with the flat of the tip ready to press on the component leg, but first heating the board with end of the tip, before pressing onto the component and then bringing the solder in when BOTH are hot enough to melt it (applying the solder as close to the component and board as possible). The key here is that you want to be heating the component leg and the board AT THE SAME TIME.
It helps, if there is a small bit of solder on the tip, so that it makes good contact and transfers the heat quickly. Then removing the solder first when there is enough, let the solder flow to where it should and remove the iron. If there isn’t enough, or it hasn’t flowed far enough, I can then re-apply the heat. The solder should melt almost instantly, or either the parts aren’t hot enough, or they are dirty.
Try again –
The last tip is, if the joint looks like it isn’t working, remove the heat and try again in a few seconds. Often, you’ll find that you just weren’t making good contact with the board/component, or there was some dirt in-between. Avoid piling on more and more solder, you will only ever need a small amount (so if need be clean it off and try again – you will probably find the solder which is left behind will help make a new cleaner contact).
Do it in stages –
When soldering components with lots of legs or components that are hard to position correctly, solder one leg and then check everything. It is far easier to adjust a single leg, than having to heat up several legs at a time.
Removing solder –
This is difficult, as solder likes to stick. There are two main ways to do this, but both often need a little manual pushing of spare bits of solder out of way if left behind with the iron’s tip (there will always be some solder left behind – but removing most of it will stop it getting in the way and allow cleaning).
Solder Sucker –
While they look like they wouldn’t work, they can be quite good at removing large lumps of solder and cleaning pads (but are difficult if the place is hard to reach, and takes good timing to melt the solder and suck it up). Be warned it is easy to re-add solder by mistake if you forget to clean it out (old bits of solder can drop out). When it works, it can leave quite clean results.

Solder Sucker/Pump
Solder wick –
This can be quite good as you press the braided wire onto the solder and melt it. Just don’t panic if you end up soldering it to the board too! Just reapply the heat and lift it off before removing the iron. It can be a little messier since it tends to squidge the solder as it melts, but it is much less time critical than using the solder sucker.

Soldering Wick
Secure your work –
Finally, make sure your work is held securely. It is always a challenge to hold the soldering iron, the component, the board AND solder at the same time (this is why I put the steps in order so that you can lay the board on the desk). You will want to ensure that nothing moves while you are trying to apply the solder, and most importantly when it is cooling (the first 1/2 sec after removing the heat). I often put tools on top to hold it still while I am working, but sometimes a small vice can help, or you can get holders (I’ve not used them myself, not sure how helpful they are to use). Also make sure you have plenty of light, it makes much easier if you can clearly see everything.

Soldering holder
Double check before you power on –
Make sure that you give the board a close inspection before you power it up, check for any joints which may have joined tracks or made links you didn’t want. You may see some the clear stuff around the joint, that is flux (it is put inside the solder to help clean the surface as it melts), it won’t conduct so don’t worry if it covers nearby tracks/components.
Also check that each of your components are around the right way, it is easy to focus on getting the joint right only to find that you’ve put it backwards.
Number one tip:
Take your time, relax and enjoy it. Rushing things or getting worked up won’t help, take a break if you need to and come back to it.
Oh, and just so you know, I’ve made plenty of my own mistakes with soldering, putting components in the wrong way around, burnt fingers, overheating components, making shorts between tracks, even soldering everything on only to find the board was around the wrong way… When you get past the frustration stage, it is still great fun.
So what happened to our friend Paul… in his words:
“I’ve DONEEEEEEEEEEEEEEEEE IT!!!!”

Paul’s New Attempt
I’m sure you’ll agree, the result speaks for itself, and his board now works perfectly. While I’m sure some of the tips may have helped a little, it was his determination and not giving up which got him the result he deserved.


[…] Guide to…Soldering […]
Excellent tips. This will really help people. Like most acquired skills, you find you get a feel for the process after you’ve done plenty of it. Switching from 1mm to 0.7mm solder was a major factor in my soldering improving.
Yep smaller solder gives you a lot more control about where it goes and how much you melt.
Unfortunately unleaded solder is STILL more prone to failure after a period of time due to it suffering ‘shrinkage’ and eventual pull-back from the component lead or PCB track. The vast majority of faults I regularly deal with turn out to be HR (dry) joints due to the item having been assembled using lead free solder. Things like the XBox failures and many USB hard drive failures are cases in point where I’d suspect I resurrect about 95% of them by reflowing the solder mask on the board.
If you’re worried about the fumes from using leaded solder (or any solder in fact) then use a cheap bench mounted extractor fan They’re fairly low cost and they work very well.
Very true. I’ve even heard of people baking boards in the oven as a last attempt to bring them back to life.
Will add something about the fumes, ideally they should be avoided (the extractors are good).
One more thing to do is check your solder joints with a magnifying glass or stamp loop. This is particularly important when soldering allot of joints on a single board and will allow you to very accurately see if you have shorted anything or created any cold joints.
Great stuff – going to reblog this!
[…] Read the guide here […]
Many board failures can be fixed by just running over joints with an iron. You’d be amazed at the amount of TV’s and VCR’s I’ve fixed over the years without having to do component replacements. Unleaded solder can be very flakey.
It probably isn’t too bad for hand soldered items (particularly if they aren’t subjected to ranges of temperature/movement). For production items, I expect unleaded solder would be harder to work with when doing flow wave soldering.
Great guide.Thanks for sharing. I did not use soldering pump before. But, I always use the solder wick to remove the solder when desoldering. It is very effective.
Glad you liked it. Both work well depending on what you are doing.
Hello, I’m making a portable computer with my Raspberry Pi 3 B+, and am newto soldering. I read your post, but It didn’t say what gauge of wire to use (the wire that is held on with solder)
For wiring between components on a board I use single core 24 guage (0.2mm). Also good for breadboard connections. Between pcb boards multicore wire is recommended.
Ok, thanks!