
Now you can connect to your Raspberry Pi with just a network cable!
No router or hub required, just a computer or laptop with a network port.
You can even configure it directly on your laptop using a SD-Card Reader, so it is great for those times when there isn’t a nearby screen available to use, but you simply have to get your “Pi On”.
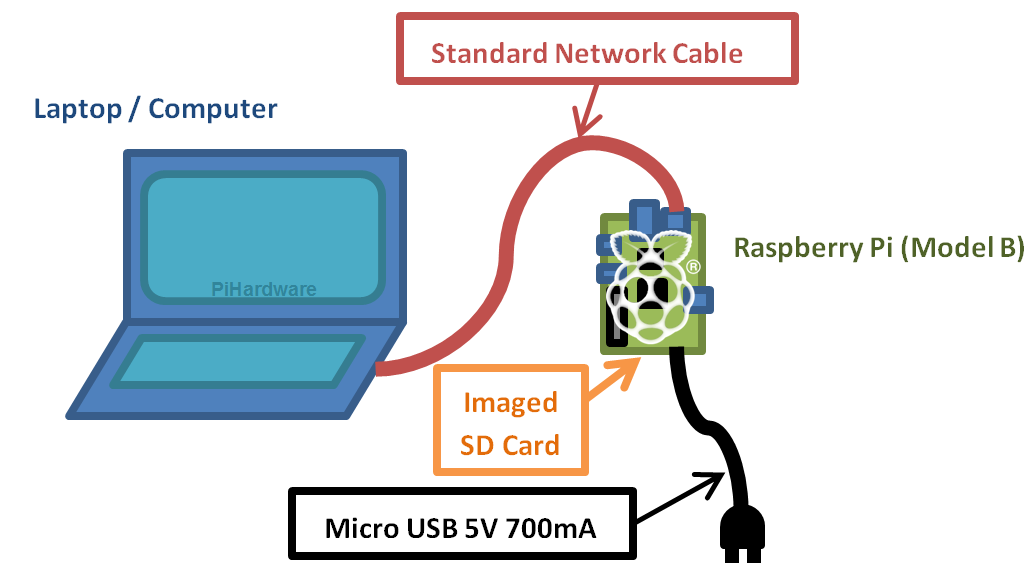
Connect and use your Raspberry Pi with just a Network Cable, a standard Imaged SD Card and Power!
This creates a direct network link between your Computer and the Raspberry Pi, so you can use SSH and X11 (to run graphical programs on your laptop), VNC and use shared network folders.
See the Guide To…Direct Network Connection for more details.
Or see the cut-down version of the instructions:
In A Nut Shell…Direct Network Connection for more advanced users who won’t need all the details.
Please let me know if the Meltwater Mod doesn’t work for you, or if you have additional questions (I am keen to make this as clear and simple as possible).
UPDATE 16April13: I’ve also added a fix for using Tkinter and PyGame based python scripts with X11-Forwarding!

Didn’t work for me
If you send me more details about which part, then I can help you to get it working. Common things I’ve found is when computer has wifi, it can ignore the LAN port until you switch it off (you can switch it back on after), and ensuring the network cable is plugged in to both when powering up the RPi (ensure you wait for your computer to get the IP address set – can take time). If you use a screen and keyboard you can test each step.
Thanks man it was really really great. I am a beginner and this helped me a lot.Your detailed instructions was very clear.Thanks for all the time you spent.
Once i plug in the network cable what do i do/ (I’m a beginner)
Ensure you have the IP addresses set (as mentioned in the guide), then you use a program called putty (for windows) which you use the ip address of the RPi, to connect to it. This will allow you to control the RPi via the command line. You can also use Xing or VNC to use programs which use the desktop too.
If anyone is interested, I created a tutorial for doing this using Vista Home and Open DHCP Server. You can read the tutorial here:
http://petetomlinson.com/?p=680
thank you that helped
Hi
I’m confused?! I have a mac, so I disabled the wifi and then tried to find the ip address, but it said it was not connected?
So, how do I find out the IP address of my mac if it’s not connected?!
Sorry, this might sound dumb, but I can’t make sense of this.
1. Ensure your wired LAN adaptor is set to automatic.
2. Set the Raspberry Pi IP address by editing the cmdline.txt file (to something in the range 169.254.x.x (i.e. 169.254.10.10))
3. Then connect and power up your Raspberry Pi. It should get allocated an IP address in the range 169.254.x.x
4. You should then able to connect using SSH as you would when connected to a normal network (since both computers are now on the same address ranges).
Disabling the wifi just ensures that the computer doesn’t try to use that instead for ssh or pings (sometimes it will pick the first active connection).
Hi
Thanks for getting back so quickly! You’re help is much appreciated!
I have checked the wireless router and it is set to automatic.
I changed the cmdline.txt by adding ip=169.254.10.10
I am assuming that I then open the Terminal utility on my matchbook pro and type the following:
ssh -X 169.254.10.10 -2 pi
I then get a message:
raymiroberts@169.254.10.10‘s password: So I typed in raspberry (default)
I then get an error:
Permission denied, please try again.
Can you suggest what is wrong?!
Thank you
Raymond
I’m not a mac user, but the command line I think should be “-l pi” that is a lower case L. Otherwise it is trying to log you in with raymiroberts as the user name.
Sounds like you should be sorted then, as it has the network link to get that far! 🙂
Thanks meltwater2000, everyting is now working fine, thanks to you!!!
Cheers!
Raymond
Always happy to help. Thanks for providing enough detail that I could easily spot the problem.
thanks for the useful article! I have been browsing for anything like to
this. ill be following your rss feed so i won’t miss the good things! once again, super blog remember to keep this up! Please excuse me if my english is bad.
thanks a lot bro
I bought a new raspberry pi b+ model and i tried to connect via ethernet …… but still its not working .. please tell me the whole procedure to install it using windows 7
The B+ should be very similar, you are just trying to set the IP address to be in the same range as your PC when using a direct LAN connection.
hi, so these instructions only work if you’ve already set your pi up? I’ve just got my pi, but I don’t have any other screen other than the one in my laptop… 😦
There are ways to do it but currently not particularly easy:
1. Manually write the image using one of the OS images on the RPi website and use the image writing program. This way the partitions are installed via PC and the boot partition is visible from windows (so you can directly edit the cmdline file).
2. Use silentinstall option of NOOBS, and then use a linux PC or linux liveCD to view the boot partition (only the NOOBS recovery partition is viewable in windows, it moves the boot partition to another partition).
The easy way…is to use the Pi-Kitchen…which I am working on to document on the site – so watch this space!
much easier is install mobaxterm on your laptop and open an ssh session login to your pi and issue the command lxsession and the pi’s screen will open on your laptop as if it was your laptop works wirelessly
I’ve not seen mobaxterm, I’ll be sure to try it out, looks like an alternative to using Xming. I quite like that Xming makes it feel like the programs are just like normal windows programs, but others may find it useful (particularly since you do have to know the executable names if not using the desktop).
I’ve added it as an alternative to try, since it looks very useful. Many thanks!