Archive for the ‘Guides’ Category

1.44″ TFT LCD Hat with buttons

I recently saw this little board, which provides a little screen (120×120 1.4″) and some buttons, in a nice little form-factor which would stack directly onto a Pi Zero. I figured this would allow a neat setup which would allow testing of various setups and also something I could use as a user interface for many other Raspberry Pi based projects.

1.44″ TFT Hat with Buttons Rear

I decided this would make a very nice little RetroPi setup, see how I got on in my Guide to…Mini RetroPi setup.

I’m pleased to announce the Pi-Stop is now available to pre-order from the 4Tronix.co.uk shop.

http://4tronix.co.uk/store/index.php?rt=product/product&product_id=390

The Pi-Stop


Take a look at the product page on the 4Tronix site for more details, or on my site, or take a look at the resources available via GitHub (contains a range of workshop materials and resources available to use or adapt for your own needs).

I look forward to sharing this exciting new add-on with everyone!

Introducing a new series of guides…

This guide will focus on exploring the many ways in which the Raspberry Pi can be used.  In the guide I will show you some neat tricks you can keep your Raspberry Pi available to you wherever you go.

12Way2Connect

The idea for this guide occurred to me when I forgot to bring a network cable with me, and I had to look through my “bag of goodies” to determine how else I could connect and make use of the Raspberry Pi.  At the time I counted 6 other ways I could have used it.

First we will cover the basic  methods of connecting to and using the Raspberry Pi, but I will keep revealing more methods (and guides) which cover the more unusual but also exceptionally useful ways in which you can use your Raspberry Pi.

I currently have 12 ways planned (the 1st 5 are the most obvious ones), but I expect there will be more by the time I have written all the guides.

If you connect with the Raspberry Pi in an unusual way then let me know (@pihardware or via my contact info)…if I’ve not got it on my planned list I’ll be sure to mention you and add it to the list.
 

I’ve created some scripts to help with the Direct Network Connections, since a number of people have had issues editing the files and getting the Raspberry Pi set-up.

However, I can only perform so much testing on my own, so I was hoping that some of you out there will be kind enough to give it a try.

Super Easy…Direct Network Connection (or so it is hoped!)

As a bonus, there is also a method for sharing the Internet over the direct connection, so if you follow the instructions and the scripts work well the Raspberry Pi should (in theory) be able to share the internet of the connected computer.
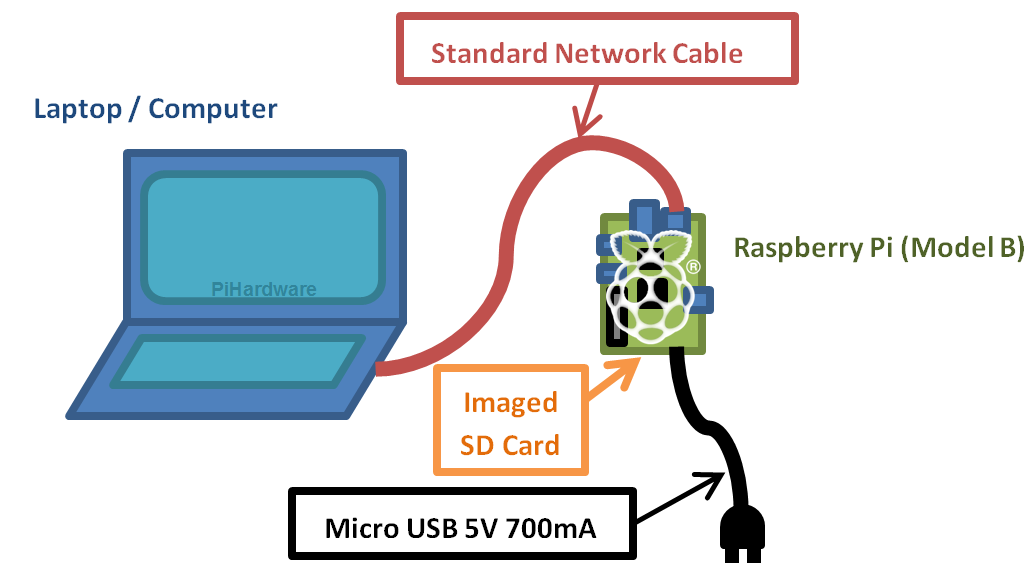
The setup would be:

Laptop connected to internet via WiFi, share Wifi using ICS with Wired Connection, use Wired Connection address as Gateway (and part of RPi IP address).

Laptop connected to internet via WiFi, share Wifi using ICS with Wired Connection, use Wired Connection address as Gateway (and part of RPi IP address).

Thanks!


______________

A note for N.O.O.B.S. users:

Users of NOOBS (the New Out Of the Box Software) will have a slightly different SD-Card structure.  Unfortunately, Windows is only able to see the partition which has the NOOBS recovery system on it.  This means if you use NOOBS you can no longer change the CMDLINE.TXT file for the Raspberry Pi by plugging in your SD-Card and changing the files in Windows.  You will still find the /boot/CMDLINE.TXT on the Raspberry Pi in the same location, so you can still use the same scripts for that when running the Raspberry Pi.

If you REALLY need to change the CMDLINE.TXT using windows (because you don’t have another screen/keyboard), then you can use a Linux Live CD or a Virtual Machine to read the SD-Card and change the CMDLINE.TXT as required.  You could even use the Raspberry Pi, assuming you have at least one SD-Card with the direct link enabled on it.

While I have not had time to properly play around with the new Raspberry Pi camera, I did create a quick time lapse video with it.

Raspberry Pi Camera installed in my case (with yet another modification for easy mounting)

Raspberry Pi Camera installed in my case (with yet another modification for easy mounting)

A week or so later during some twitter based Camera discussions with @RasPiTV @RPiSpy, we had @_smstext join in.  His question was how to get a time lapse to start automatically on power up.

What a great idea, I already had to use my “porta-pi” set-up [a portable DVD Player with some internal modifications to connect to the Raspberry Pi] to perform the time-lapse, where it would be MUCH easier to simply place the Raspberry Pi in location, plug-in a standard mobile phone charger power pack and off it goes! Challenge accepted!
(more…)

Nook

Posted: May 11, 2013 in Guides, Other Products, Raspberry Pi

New Guide to…

using the nook Simple Touch as a remote eink Raspberry Pi screen

The nook simple touch...done!

The nook simple touch…done!

What does this achieve?

Hacking the nook Simple Touch provides a low power touch-screen for the Raspberry Pi by using VNC over wifi (USB connection may be possible at some point) as well as SSH terminal access.

VNC and SSH will allow you to control the Raspberry Pi remotely over the network.  VNC will create a new remote session, rather than controlling the local session which may be displaying on the locally connected screen (this is different to when you use VNC on windows for example).

VNC allows control of the desktop.  Such as editing MagPi files using Scribus!

It should also be possible to control XBMC (Raspberry Pi media centre) and  send specific SSH commands via custom Android apps if required.

Essentially, you get a low power screen, with touch input and the flexibility of Android all rolled into one!

Oh, and you can fill up the memory with useful programming books, datasheets and code examples for those times when your Raspberry Pi is offline, but you still need your hacking/geek fix.

See the full guide here:

New Guide to…using the nook Simple Touch as a remote eink Raspberry Pi screen

Note:

Thanks for all the votes so far on what you’d like me to post next, I shall certainly get to work on a new GPIO Python lesson and post it as soon as it is ready (I know just the thing to cover!).  Keep voting though, since I shall check back and will pick the next item off the list to follow up with.

I thought I would see what the world thinks, and let you choose what I should do next.

I’ve set it to allow you to vote on more than one thing if you want to.

Thanks, I look forward to seeing the results.

Now you can connect to your Raspberry Pi with just a network cable!

No router or hub required, just a computer or laptop with a network port.

You can even configure it directly on your laptop using a SD-Card Reader, so it is great for those times when there isn’t a nearby screen available to use, but you simply have to get your “Pi On”.

Connect and use your Raspberry Pi with just a Network Cable, SDCard and Power!

Connect and use your Raspberry Pi with just a Network Cable, a standard Imaged SD Card and Power!

This creates a direct network link between your Computer and the Raspberry Pi, so you can use SSH and X11 (to run graphical programs on your laptop), VNC and use shared network folders.

See the Guide To…Direct Network Connection for more details.
Or see the cut-down version of the instructions:
In A Nut Shell…Direct Network Connection for more advanced users who won’t need all the details.

Please let me know if the Meltwater Mod doesn’t work for you, or if you have additional questions (I am keen to make this as clear and simple as possible).


UPDATE 16April13: I’ve also added a fix for using Tkinter and PyGame based python scripts with X11-Forwarding!

As mentioned at the end of the last Scratch lesson, using the bit patterns to control the RGB-LED kit can get a little confusing, and it really does not fit in with how user friendly Scratch is intended to be. So, we need to help our friend Scratch talk to the RGB-LED kit in a way that is slightly more natural.

Scratch still can't make him self understood by his new friend, we need to help him!

Scratch still can’t make him self understood by his new friend, we need to help him!

So how do we translate what Scratch is saying into a format that the scratch_gpio_handler can understand? (more…)

MORE New Lessons!

Posted: March 26, 2013 in Guides, RGB-LED Kit

Another New lesson available:

RGB-LED Lesson 3 (Scratch GPIO) – Some Simple Steps

This lesson takes you through the basic steps of getting started using Scratch and in particular creating your first Scratch GPIO script.

Quick Scratch script for testing the RGB Kit

Quick Scratch script for testing the RGB Kit

There should be no reason now why you can’t have a go and allow a small bit of the virtual world to become real!